

1 Where to start
Four steps that your work with the counter starts with.
- Fill in your profile. The app will calculate your calorie, PFC and water norms using the Mifflin-St Jeor formula. Without a profile the counter has no idea what number to guide you to.
- Get any kitchen scale. At the start you need to weigh everything you eat and add it to your Diary. Without a scale, counting turns into guessing.
- Log every single meal. Breakfast, lunch, dinner, snacks, tea with sugar, the oil from the frying pan - everything.
- Record your weight and measurements once a week. They are what shows whether your deficit is working. When your weight changes, the counter automatically adjusts your calorie norm.
2 Profile: what to enter and why
Side menu → "Profile". This is the most important screen: your whole norm is calculated from it.
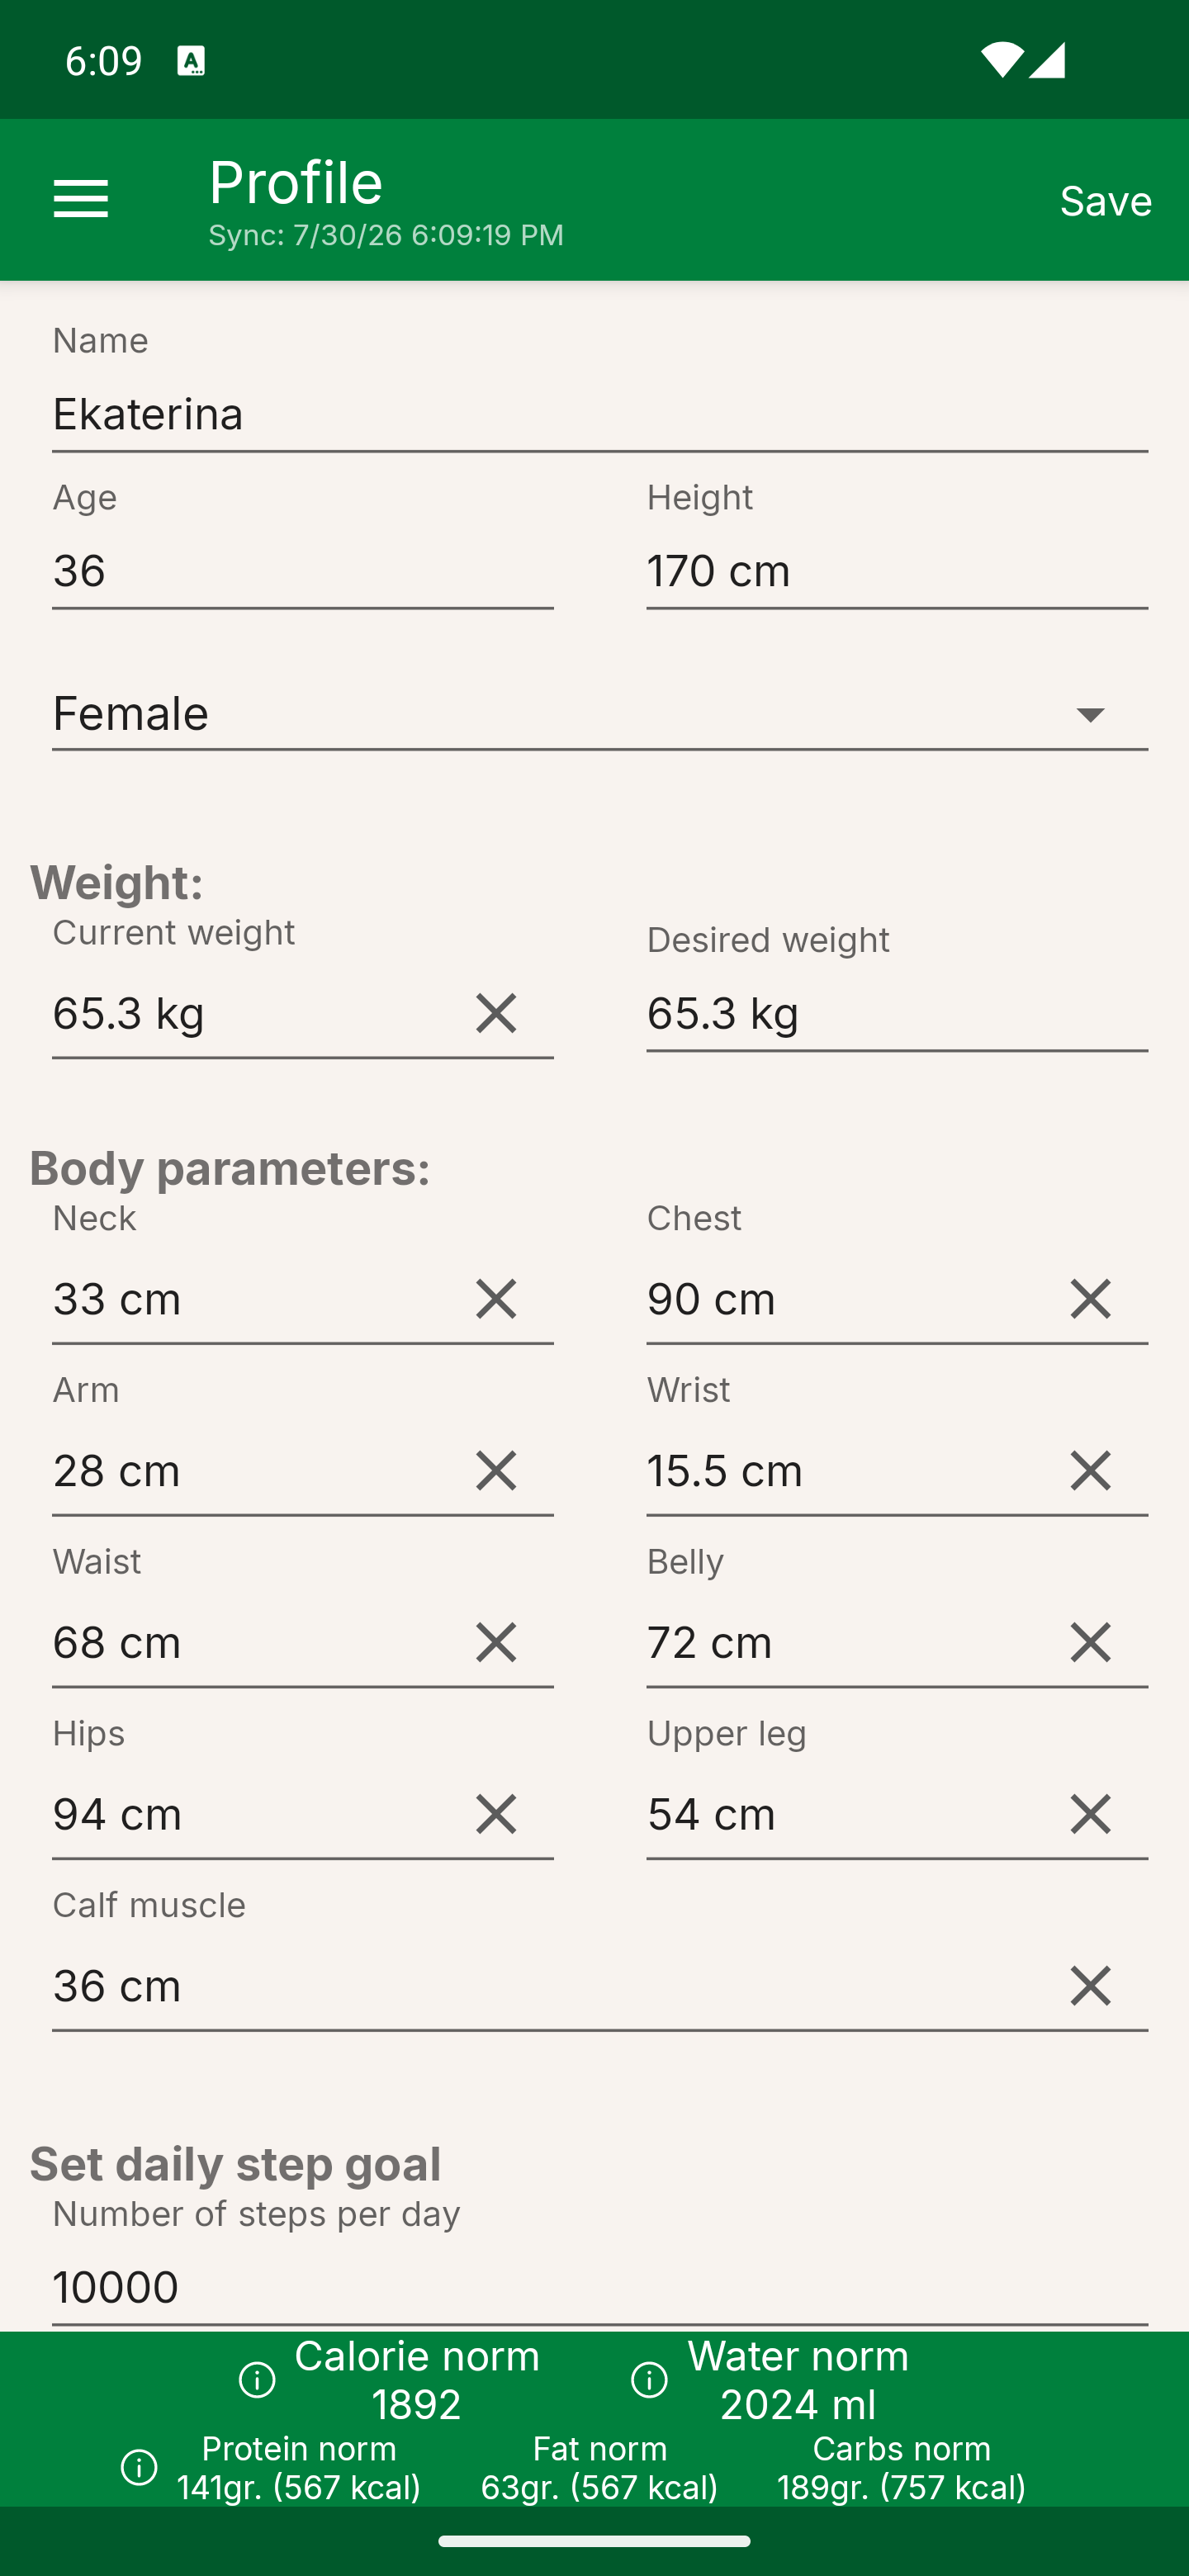
- 1Name - how the app and the chat should address you.
- 2Age and height - required fields. They go straight into the norm formula. With age your calorie need goes down, with height it goes up.
- 3Sex - the formula gives a different result for men and women, this field is required.
- 4Current weight - the basis of the whole calculation. Update it regularly: as your weight drops, your calorie norm changes too.
- 5Desired weight - an optional parameter. This is the goal you are working towards; the app can calculate your norm from it (see the "Norm calculation" switch below).
- 6Body parameters - neck, chest, arm, wrist, waist, belly, hips, upper leg, calf muscle. Filling them in is optional, but they are exactly what shows your "body quality": the scale can stand still while your measurements keep shrinking.
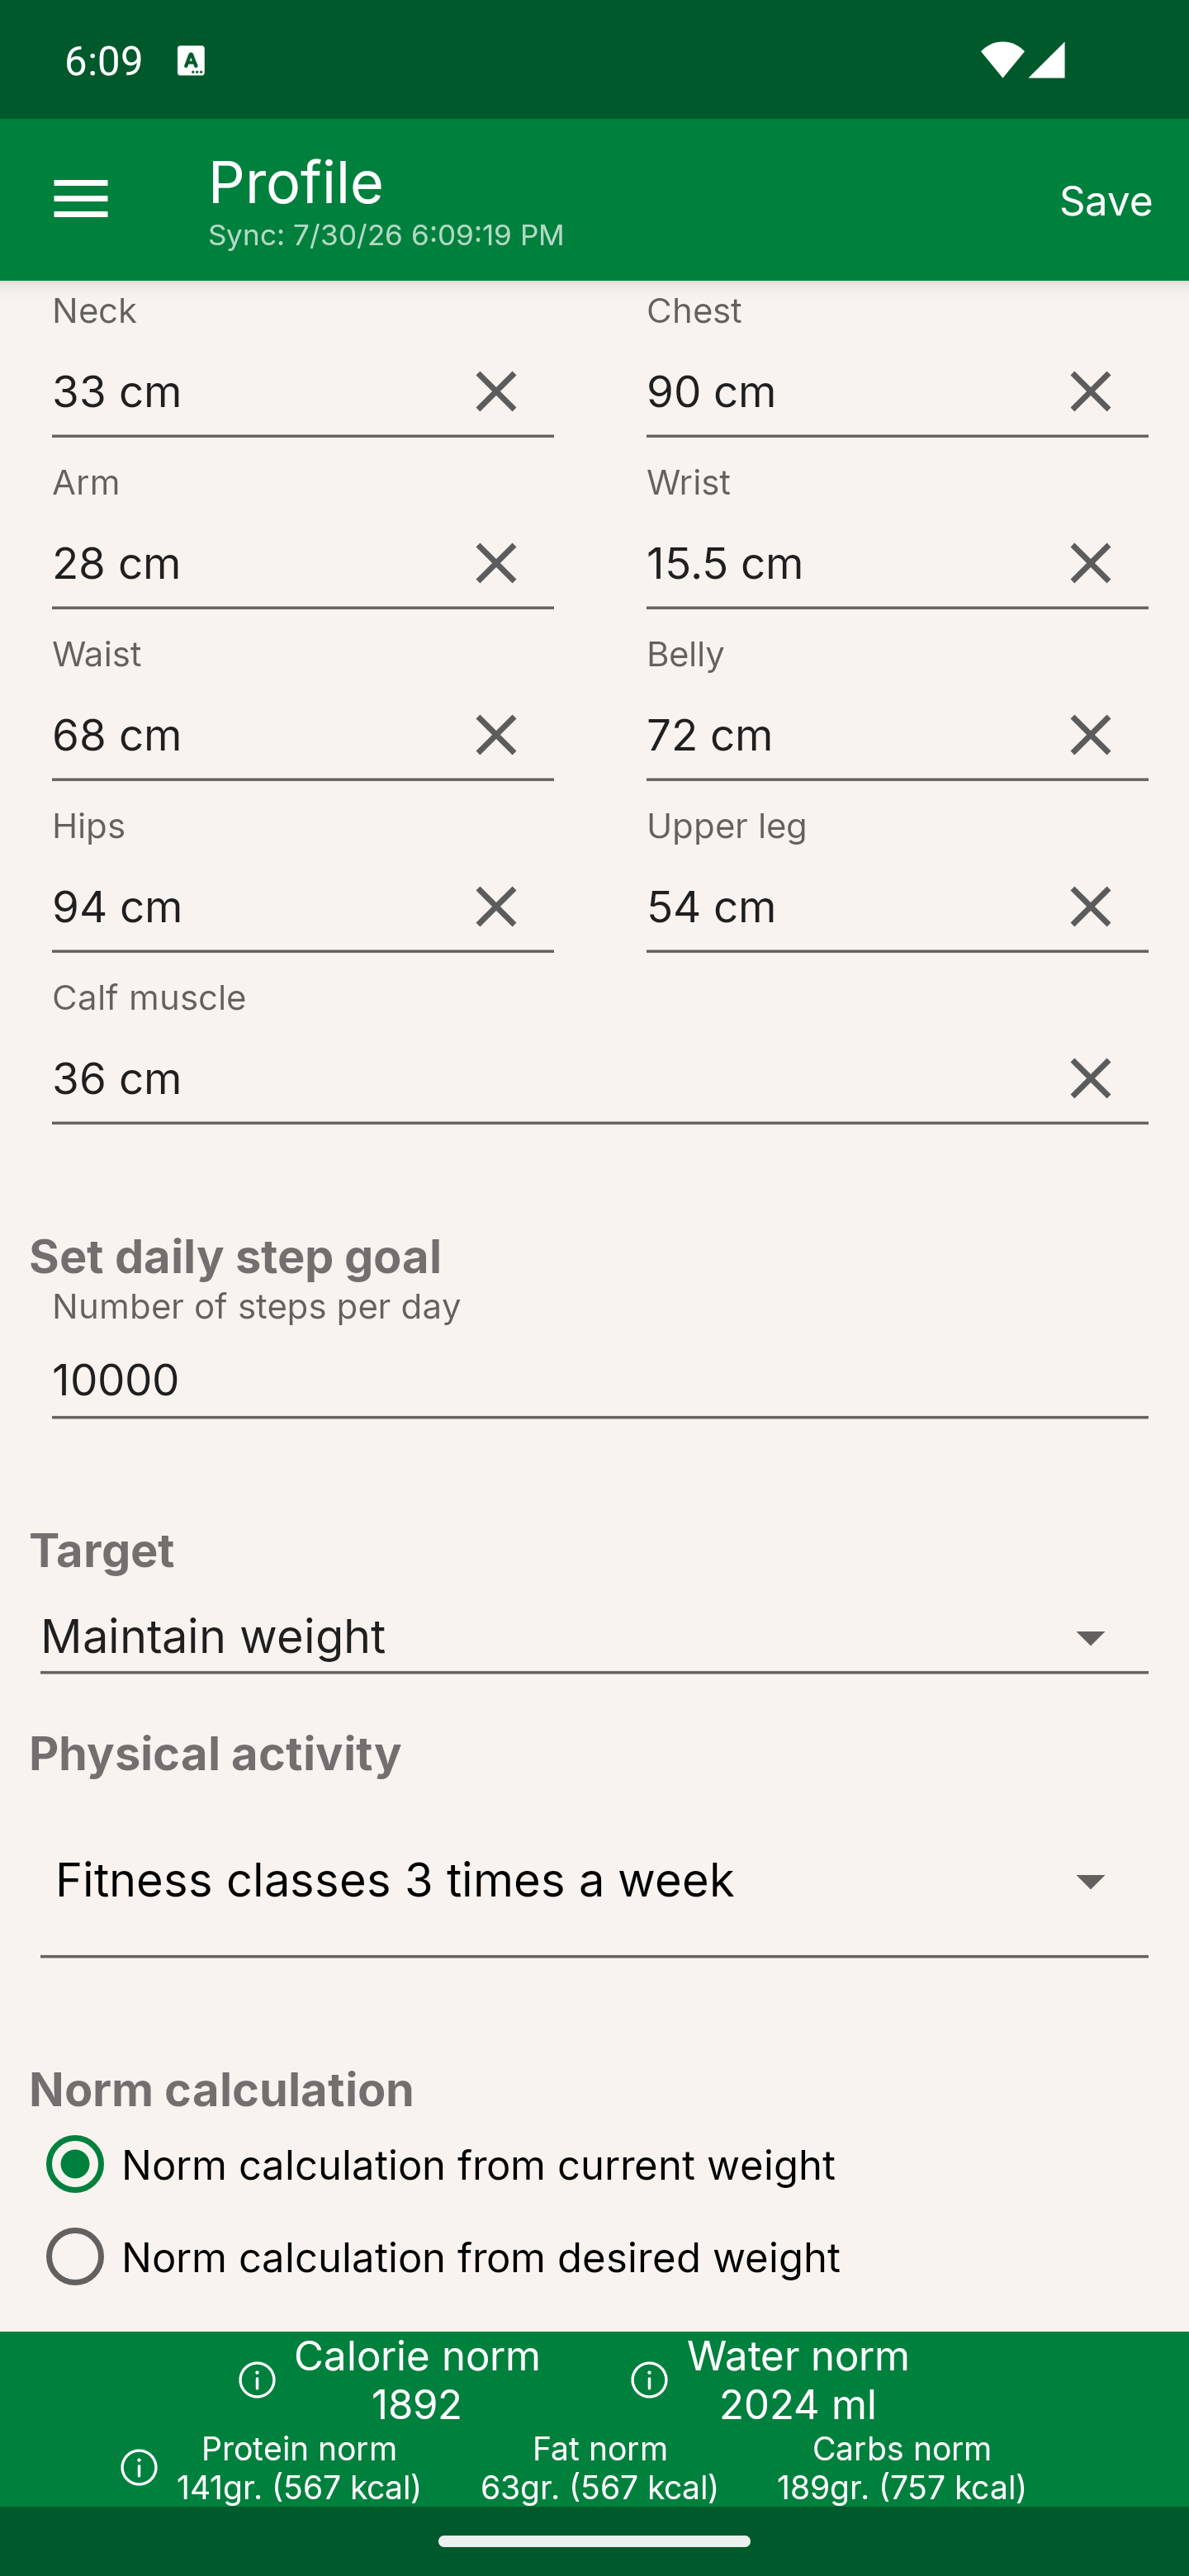
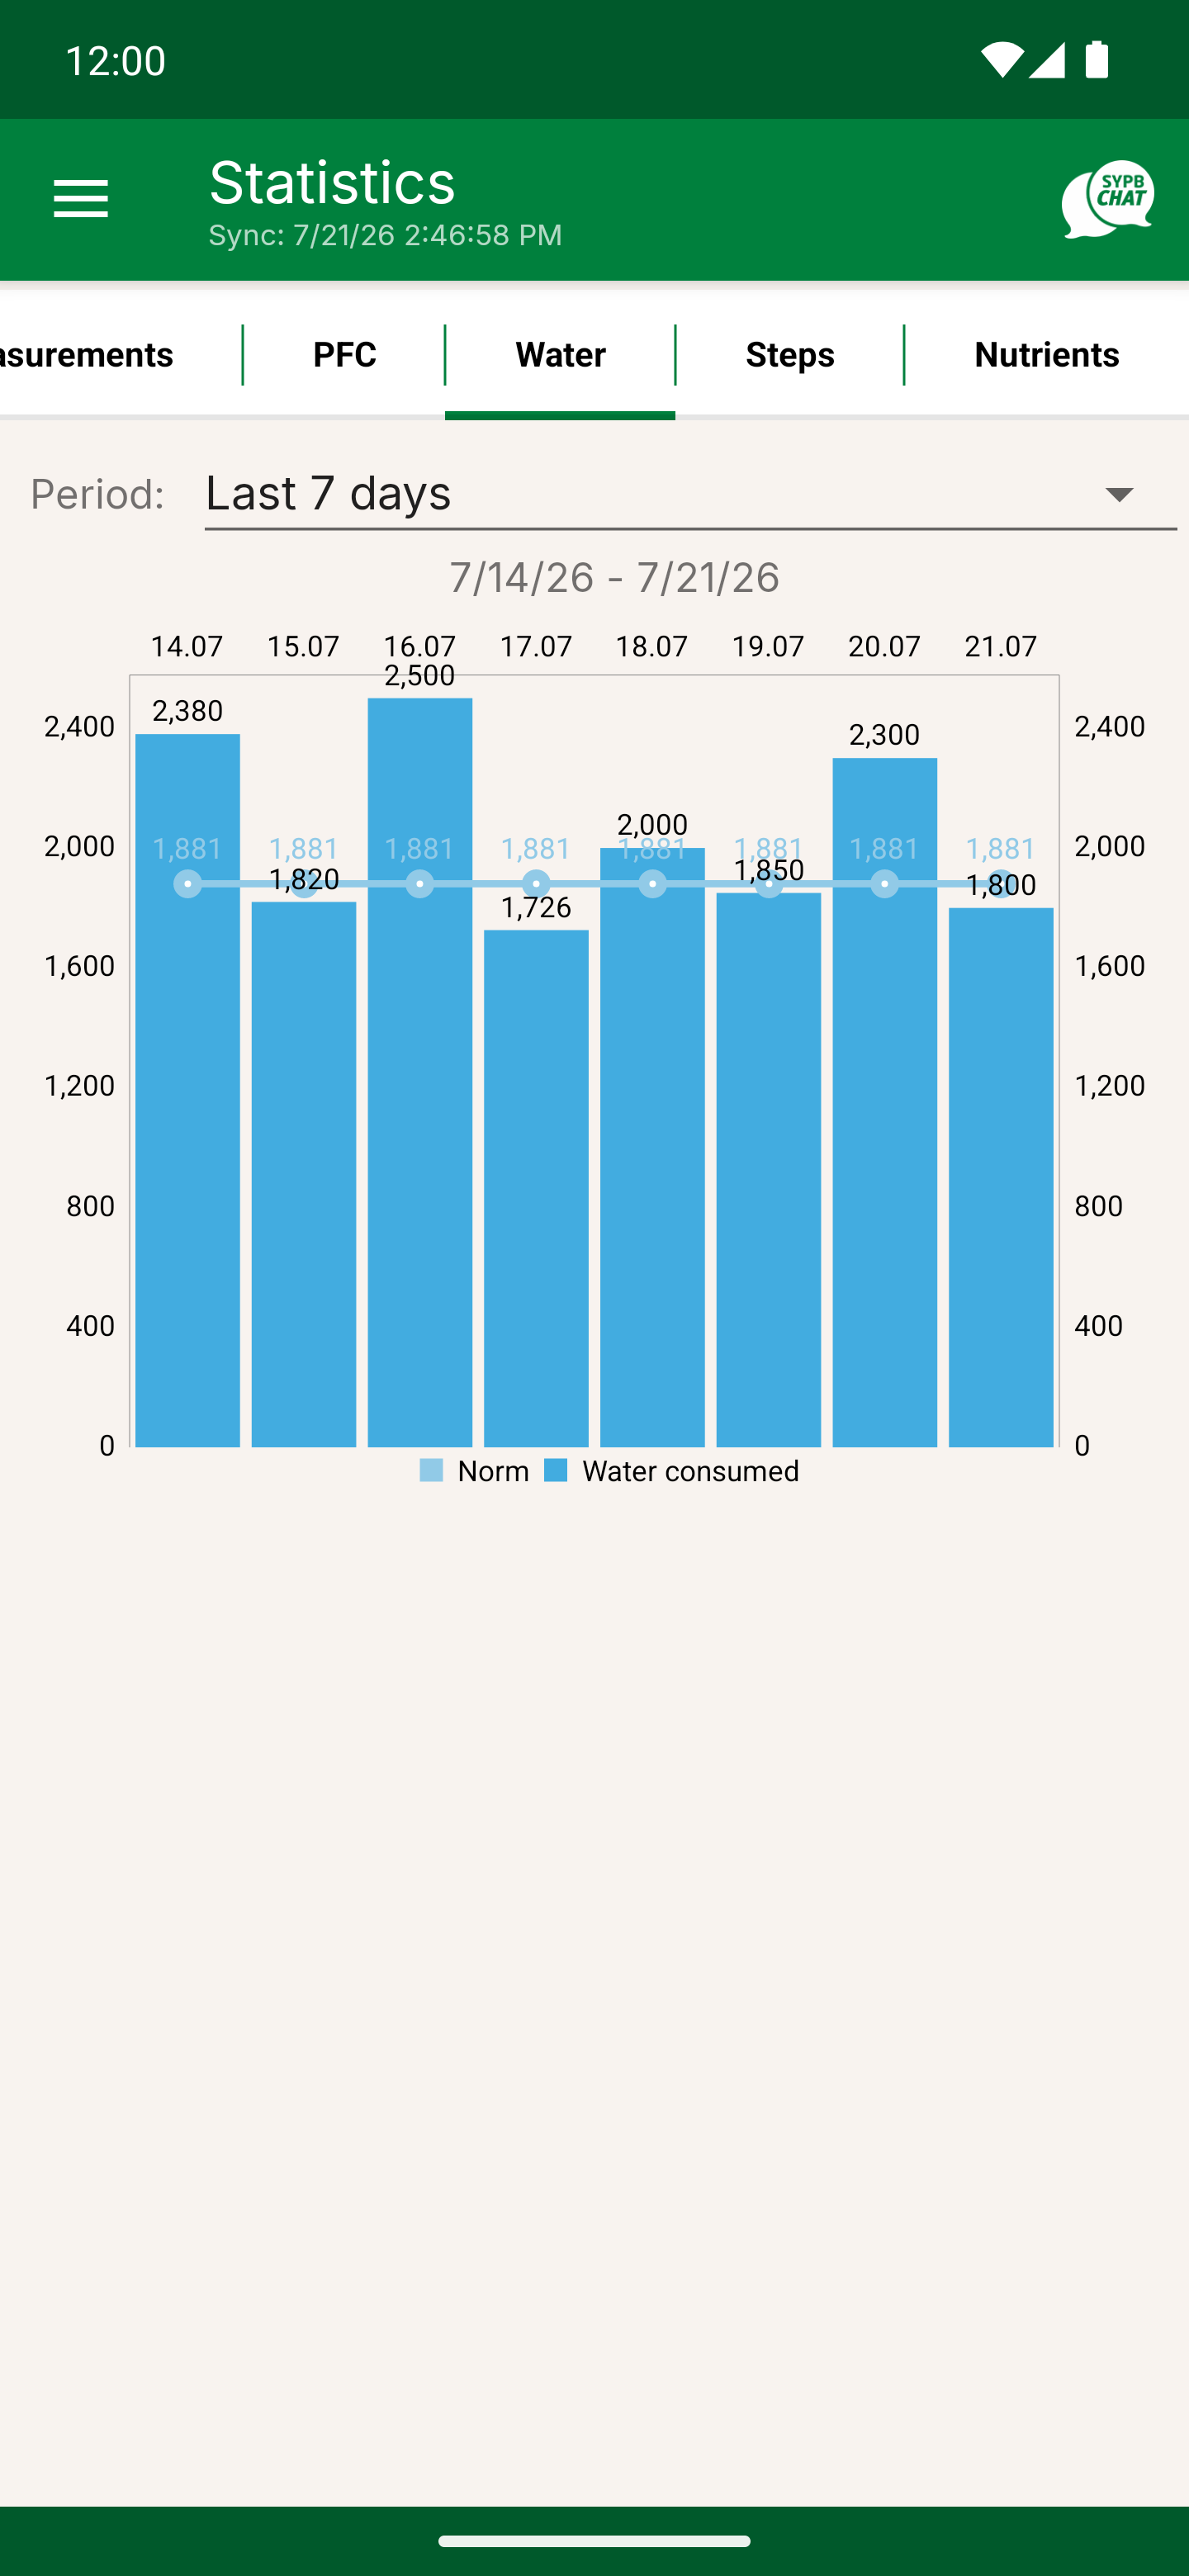
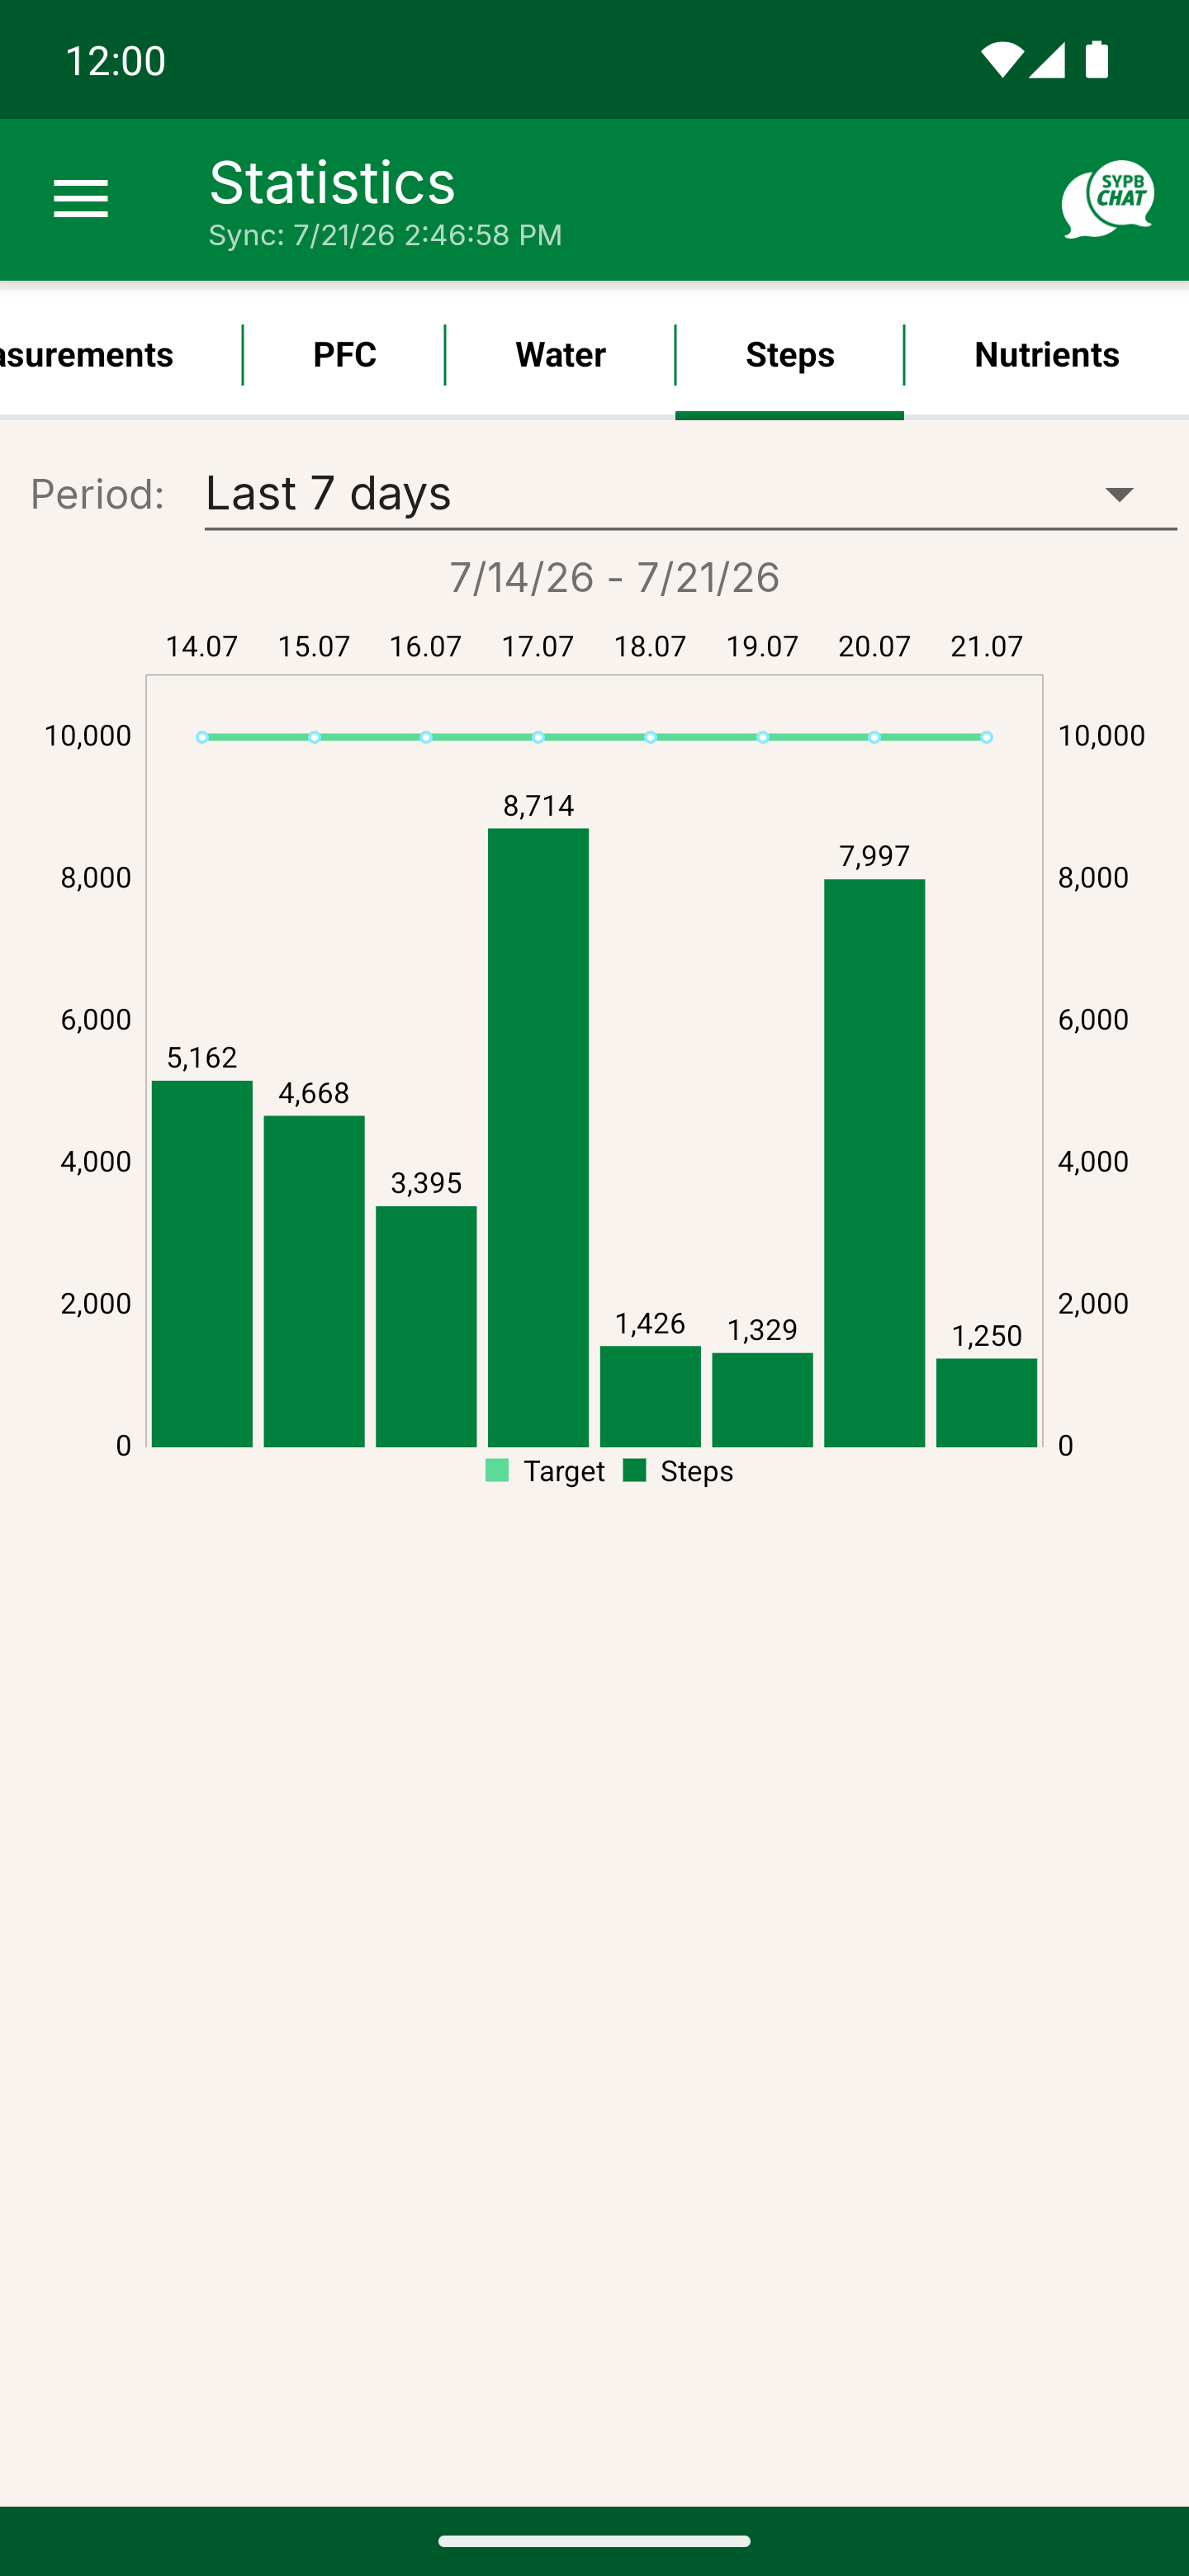
- 1Number of steps per day - your daily step goal; the "Steps" tab in Statistics is built from it.
- 2Goal - "Lose weight", "Maintain weight" or "Gain weight". This decides whether the app creates a deficit, a surplus or leaves you at your norm.
- 3Physical activity - from "Minimal or no physical activity" to regular training. Your norm is already calculated with this setting included.
- 4Norm calculation - from your current weight (recommended) or from your desired weight. Calculating from the desired weight gives a much harsher deficit and is used very rarely.
- 5The "Save" button - in the top right corner. Without it your changes will not be applied.
3 Calculating your calorie intake
Keeping an eye on calories is the most reliable way to manage your weight.
| Your goal | What to do with calories |
|---|---|
| Lose weight | Create a deficit - eat fewer calories than you burn |
| Gain weight | Create a surplus - eat more than you burn |
| Maintain weight | Stick to your norm |
The counter works out your norm automatically as soon as you have filled in your profile. There is nothing to calculate by hand - just follow the "norm" figure in your Diary.
If you want to set your own values
In the Diary, tap the parameter you need in the top row (norm, proteins, fats, carbs) and enter your own value. To have it applied every day, tick "Use the entered value by default".
4 Important settings
Side menu → "Settings". Go through them once before you start.
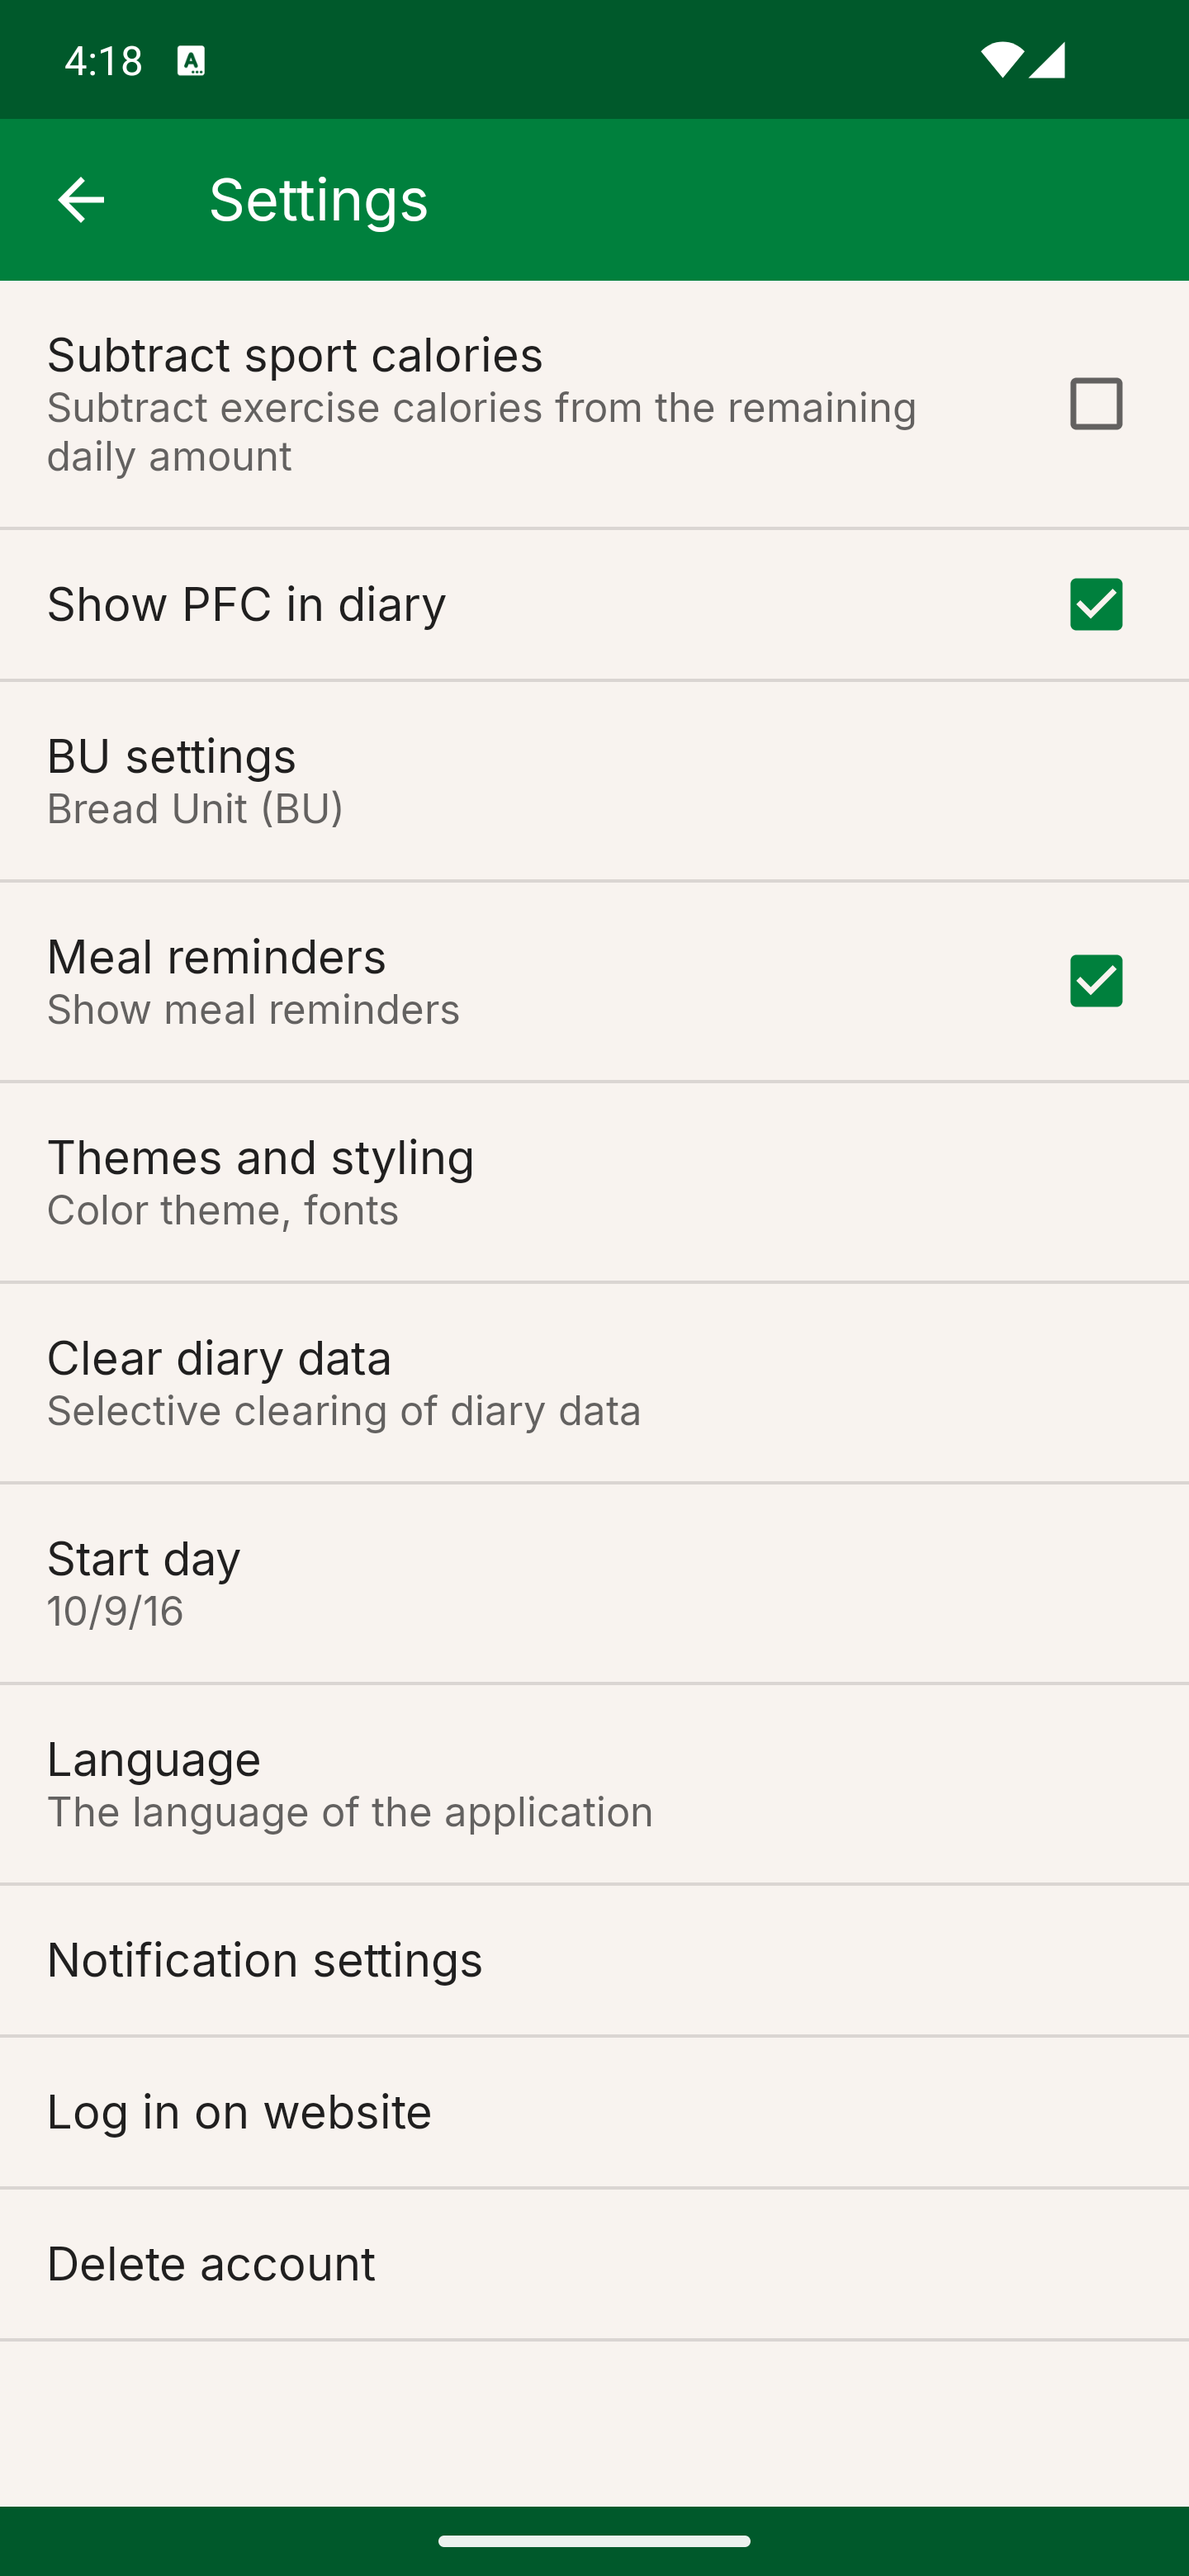
- 1Subtract sport calories - by default this checkbox is off, and it is better to leave it that way. If you turn it on, the calories from your training are added to what is left for the day and you will eat more than you need - your activity is already included in the norm calculated from your profile.
- 2Show PFC in diary - leave it on so you can see proteins, fats and carbs in every entry.
- 3BU settings - bread units. You need them if you count your food in BU.
- 4Meal reminders - the app will remind you to log your food so you do not forget your snacks.
- 5Themes and styling - colour theme and fonts, including the dark theme.
- 6Language - the app language. It is changed independently of your phone's language.
5 Main menu
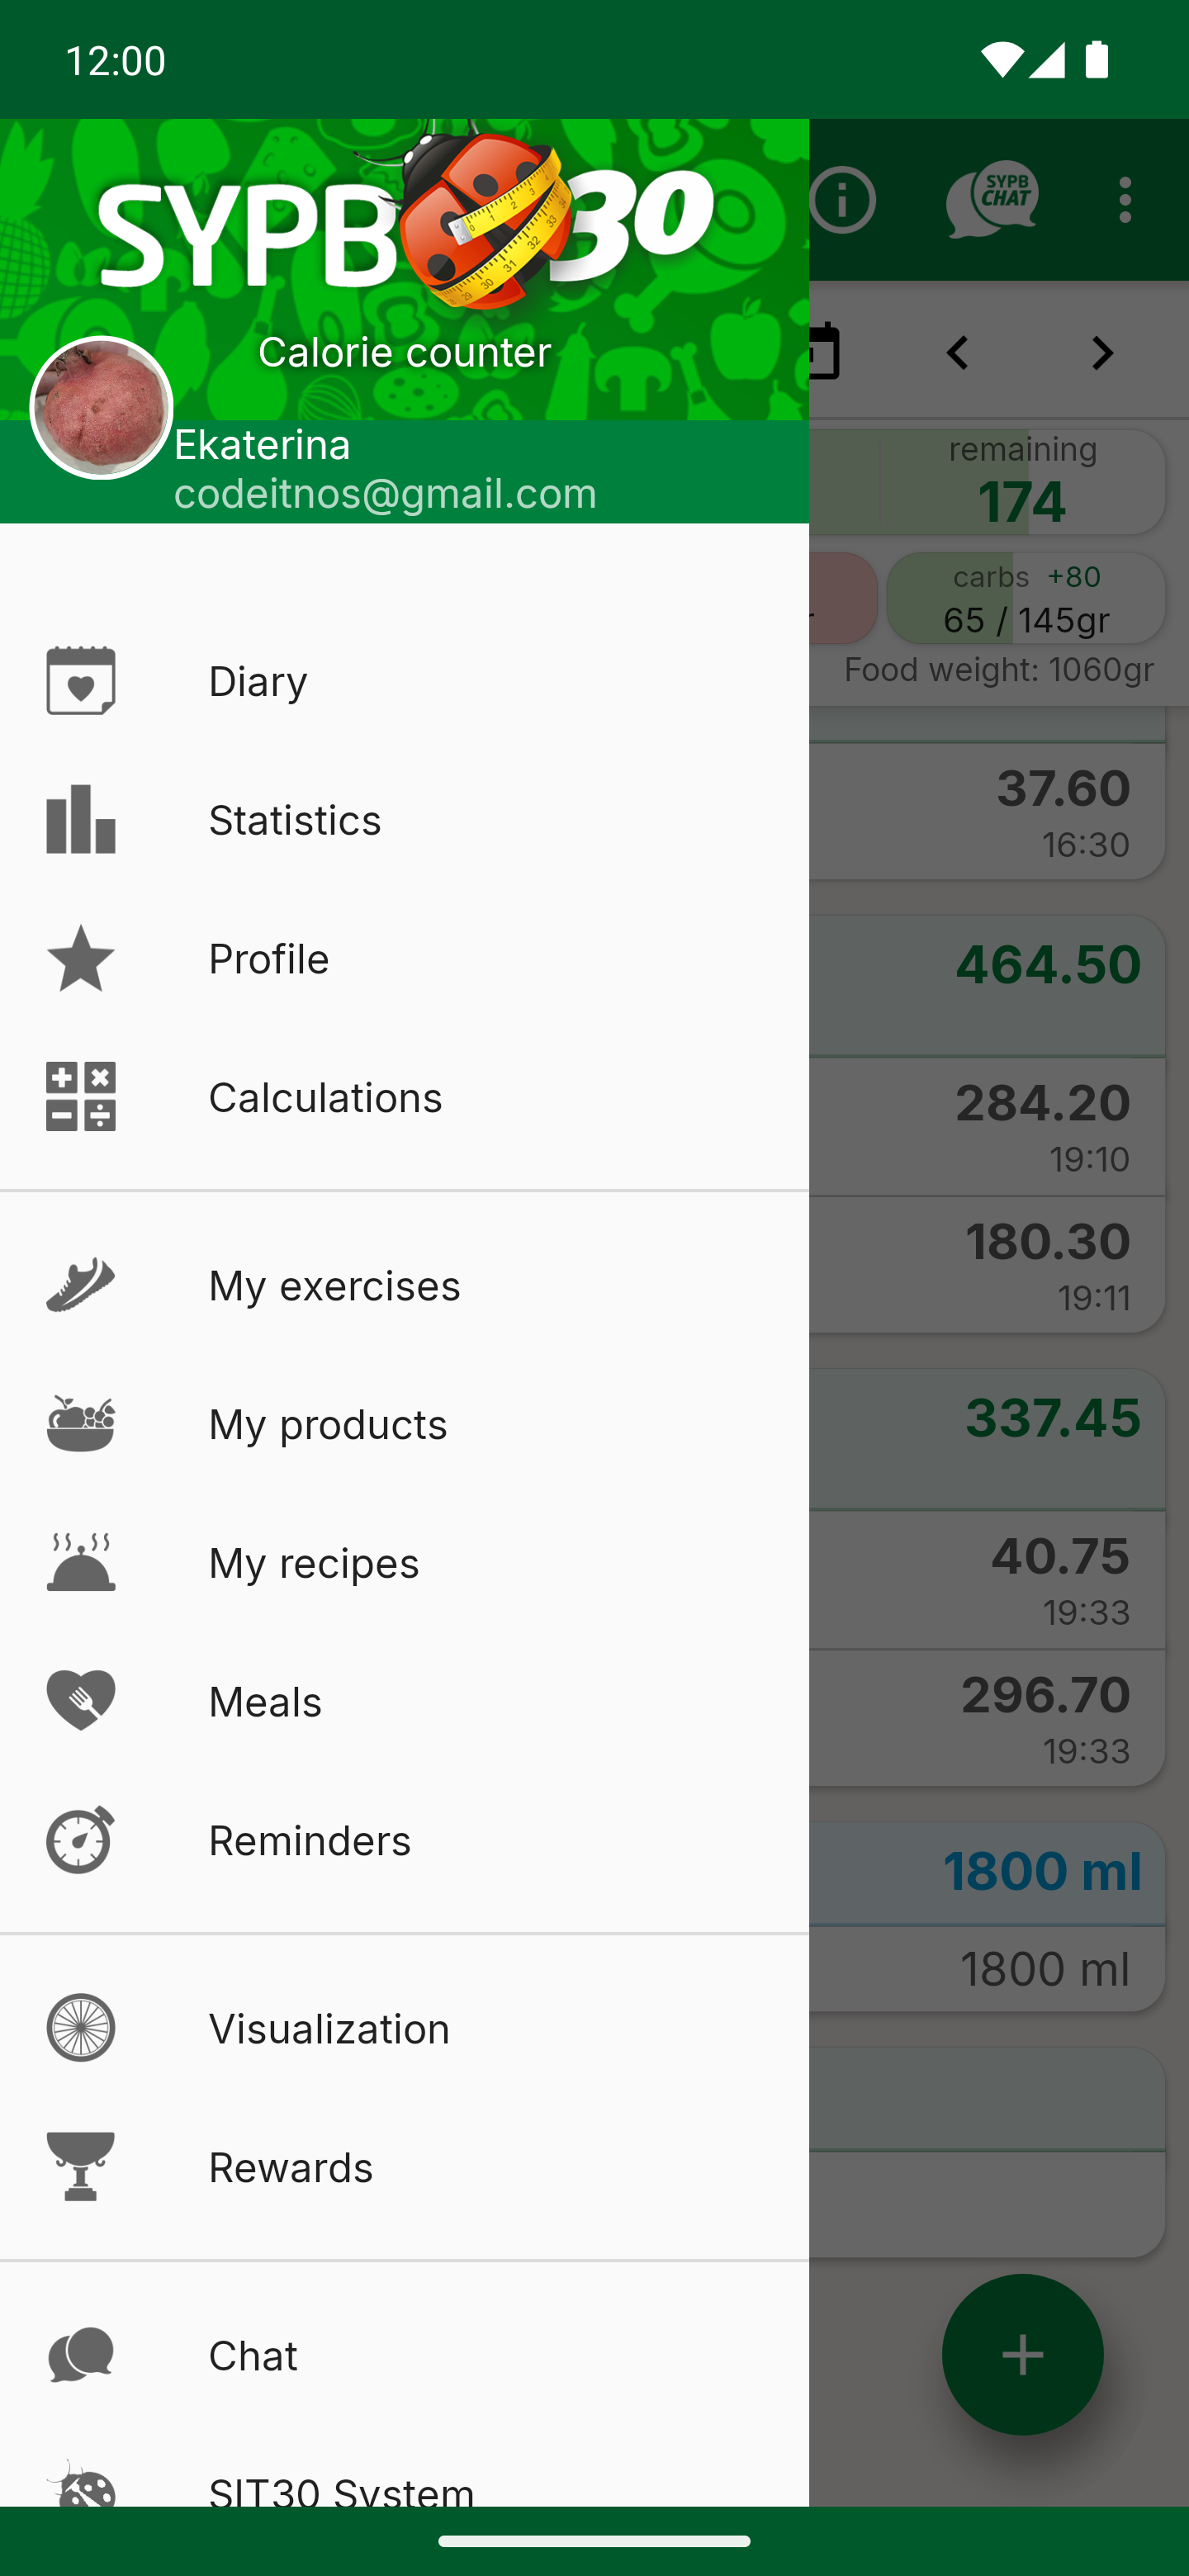
Opens with the "☰" button in the top left corner - every section is available from here.
6 Diary: how to read the screen
The top panel is your summary for the day. One look tells you whether you are staying within your norm.
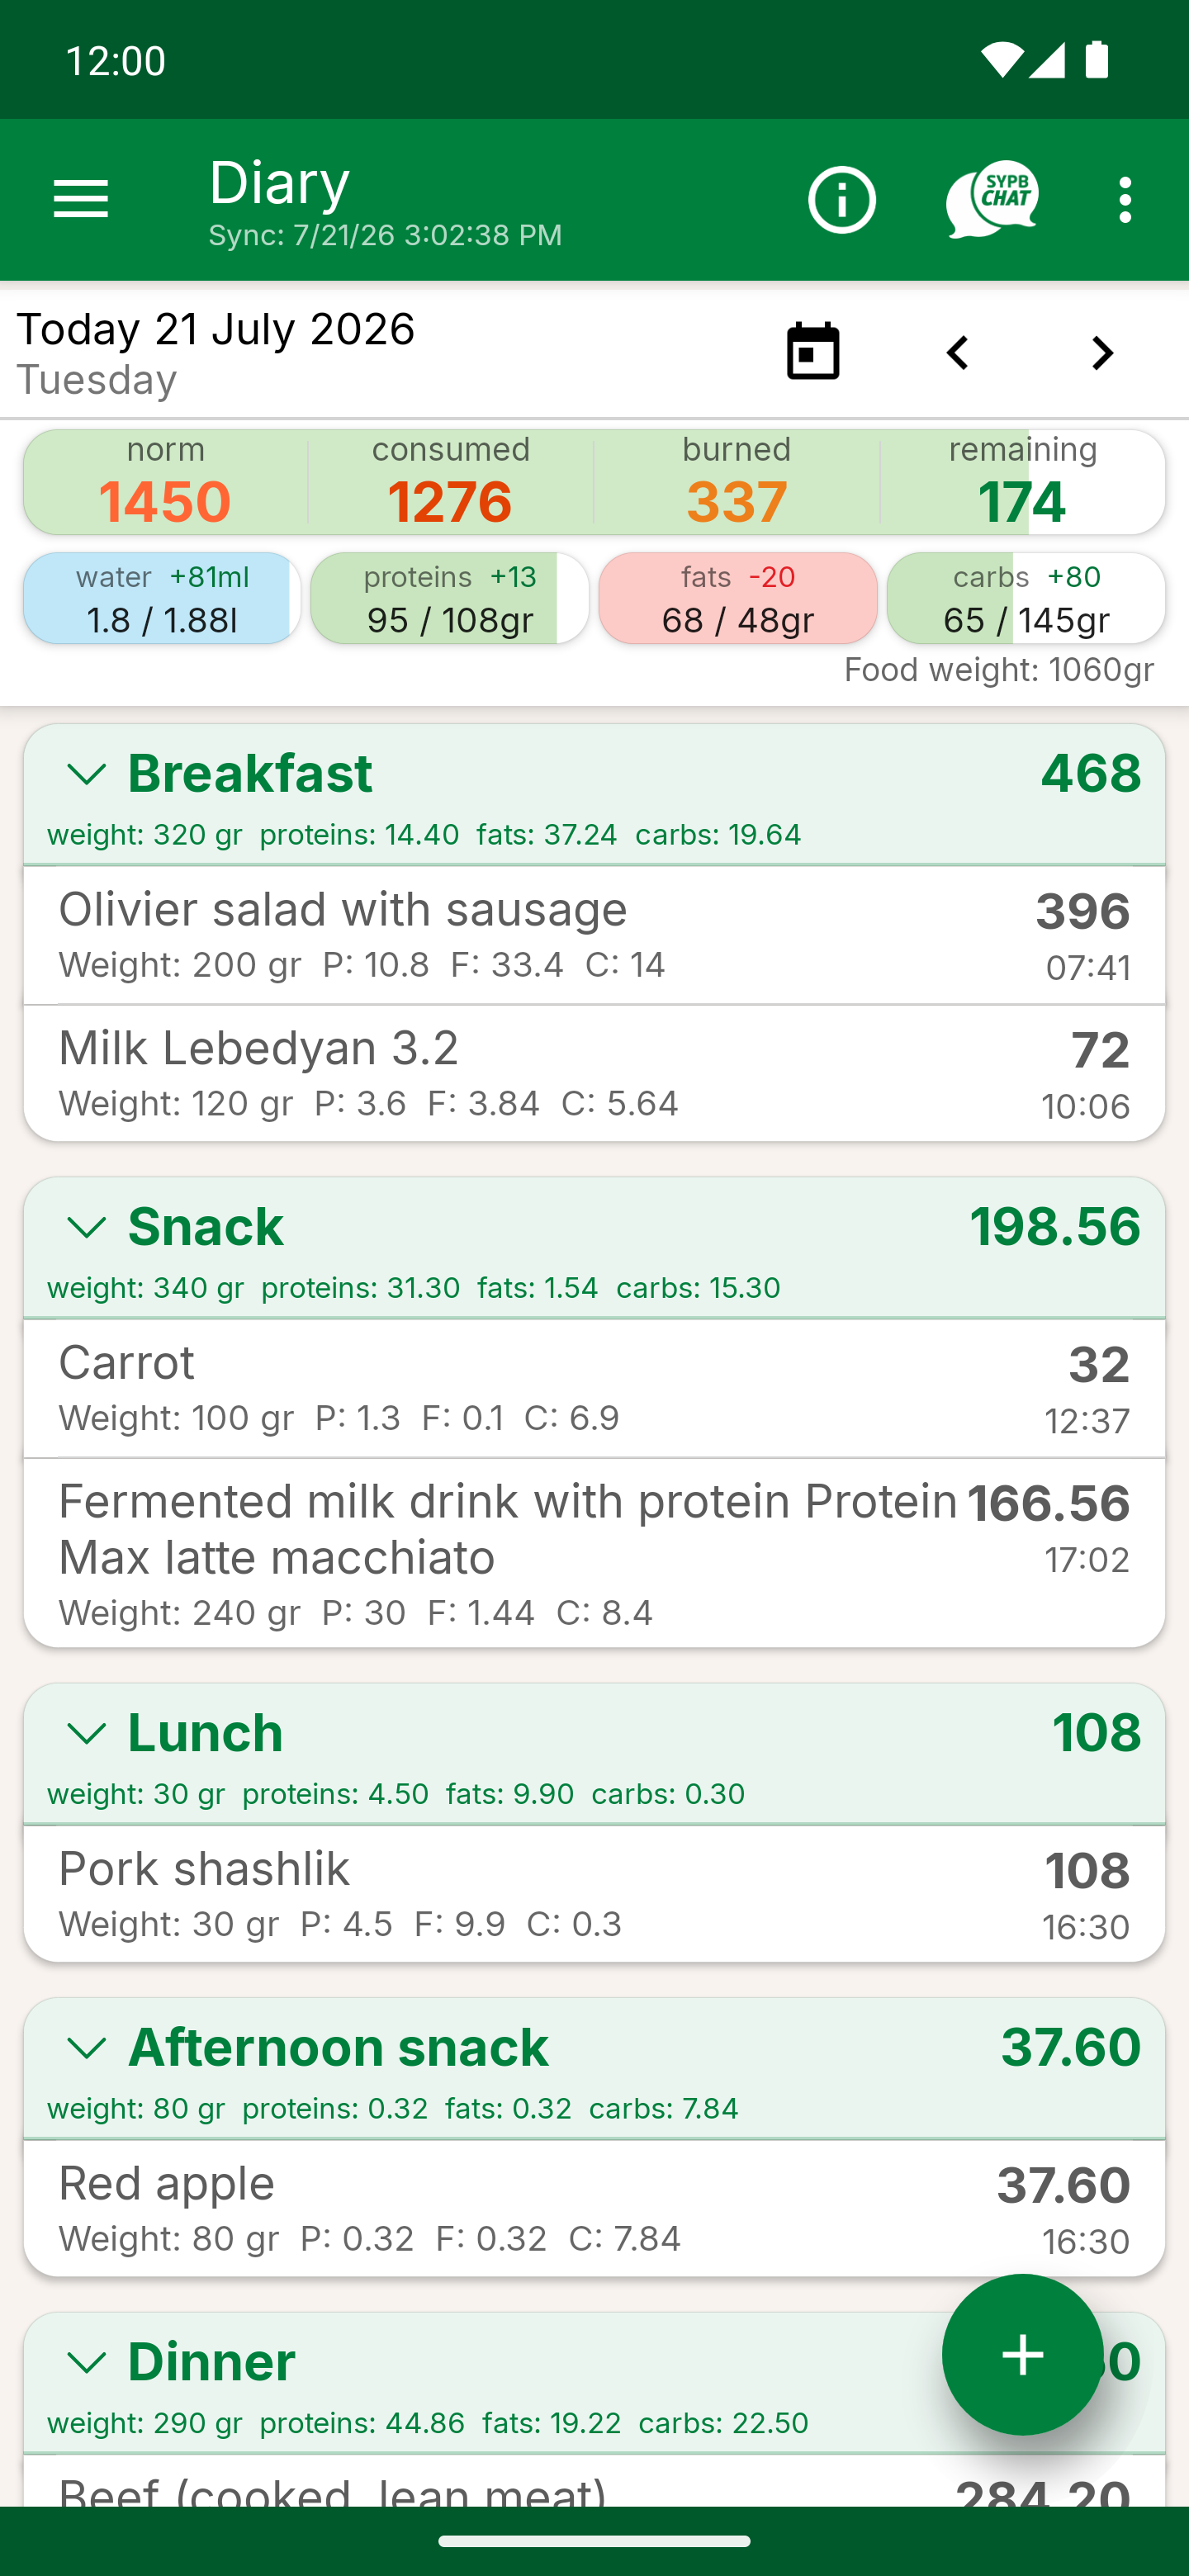
- 1Norm - how many calories you are allowed for the day.
- 2Consumed - how much you have already eaten.
- 3Burned - the calories you burned through exercise.
- 4Remaining - how much more you can eat today.
- 5Water, proteins, fats, carbs - the actual figure and the norm for each of them. A green background means you are within the norm, red means you have gone over it. The number with a "+" or "−" sign shows the difference.
- 6Date and arrows - switch between days; the calendar icon opens the date picker.
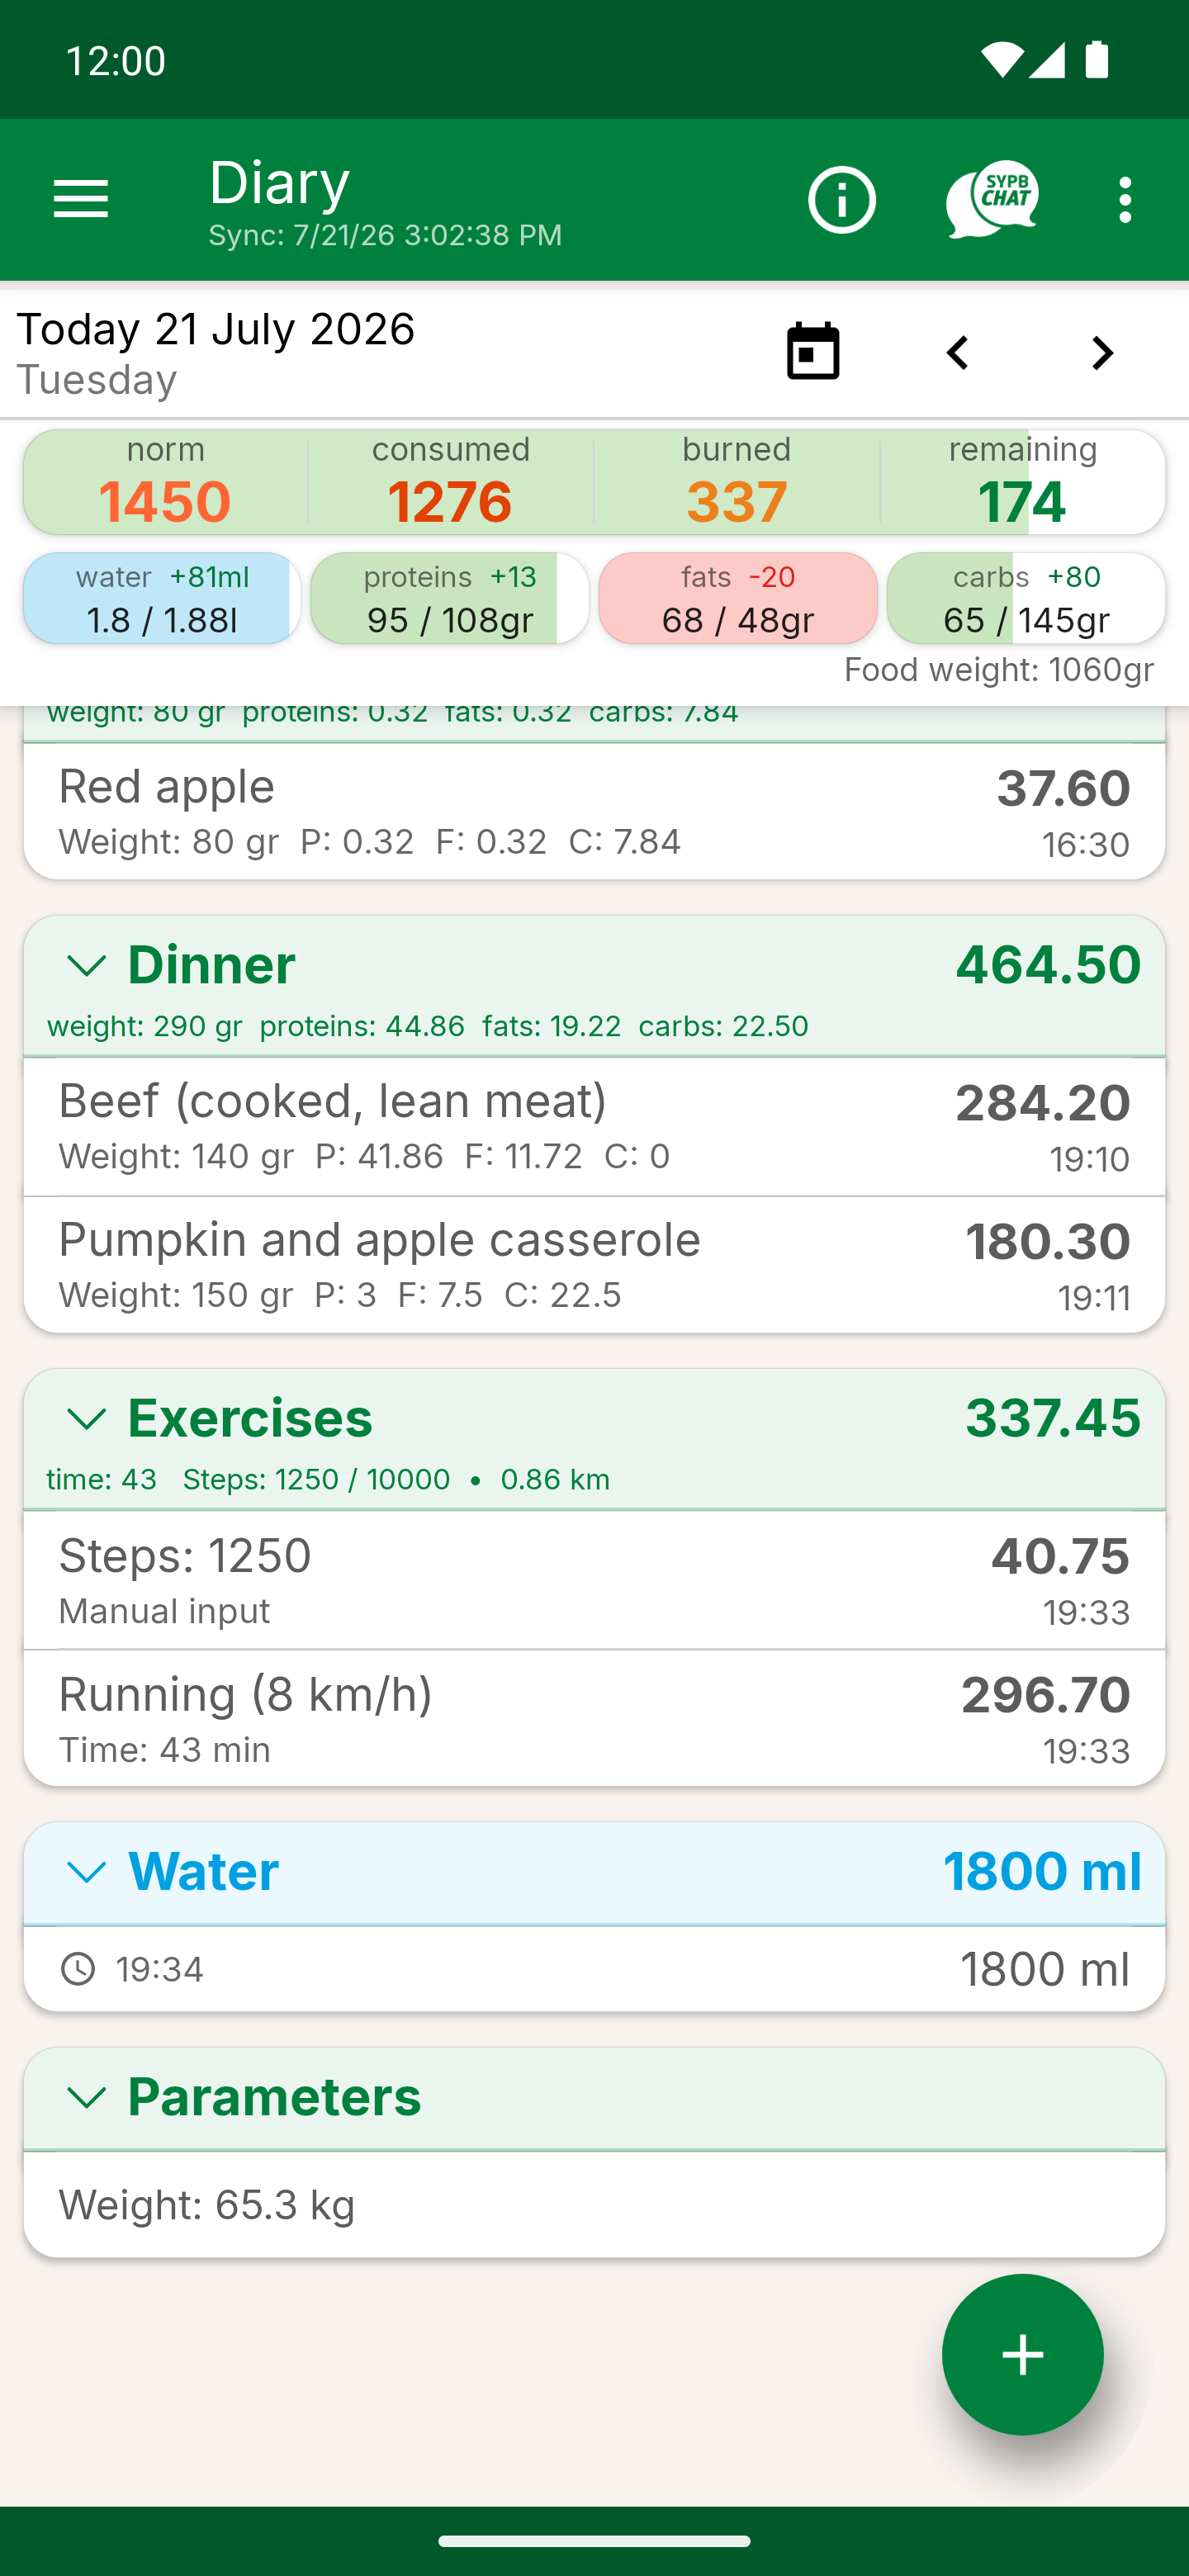
- 7Meals - breakfast, snack, lunch, afternoon snack, dinner. The heading shows the total calories, below it are the weight and PFC of the meal, and inside are the individual foods with their weight and time.
7 The "+" button: what you can add
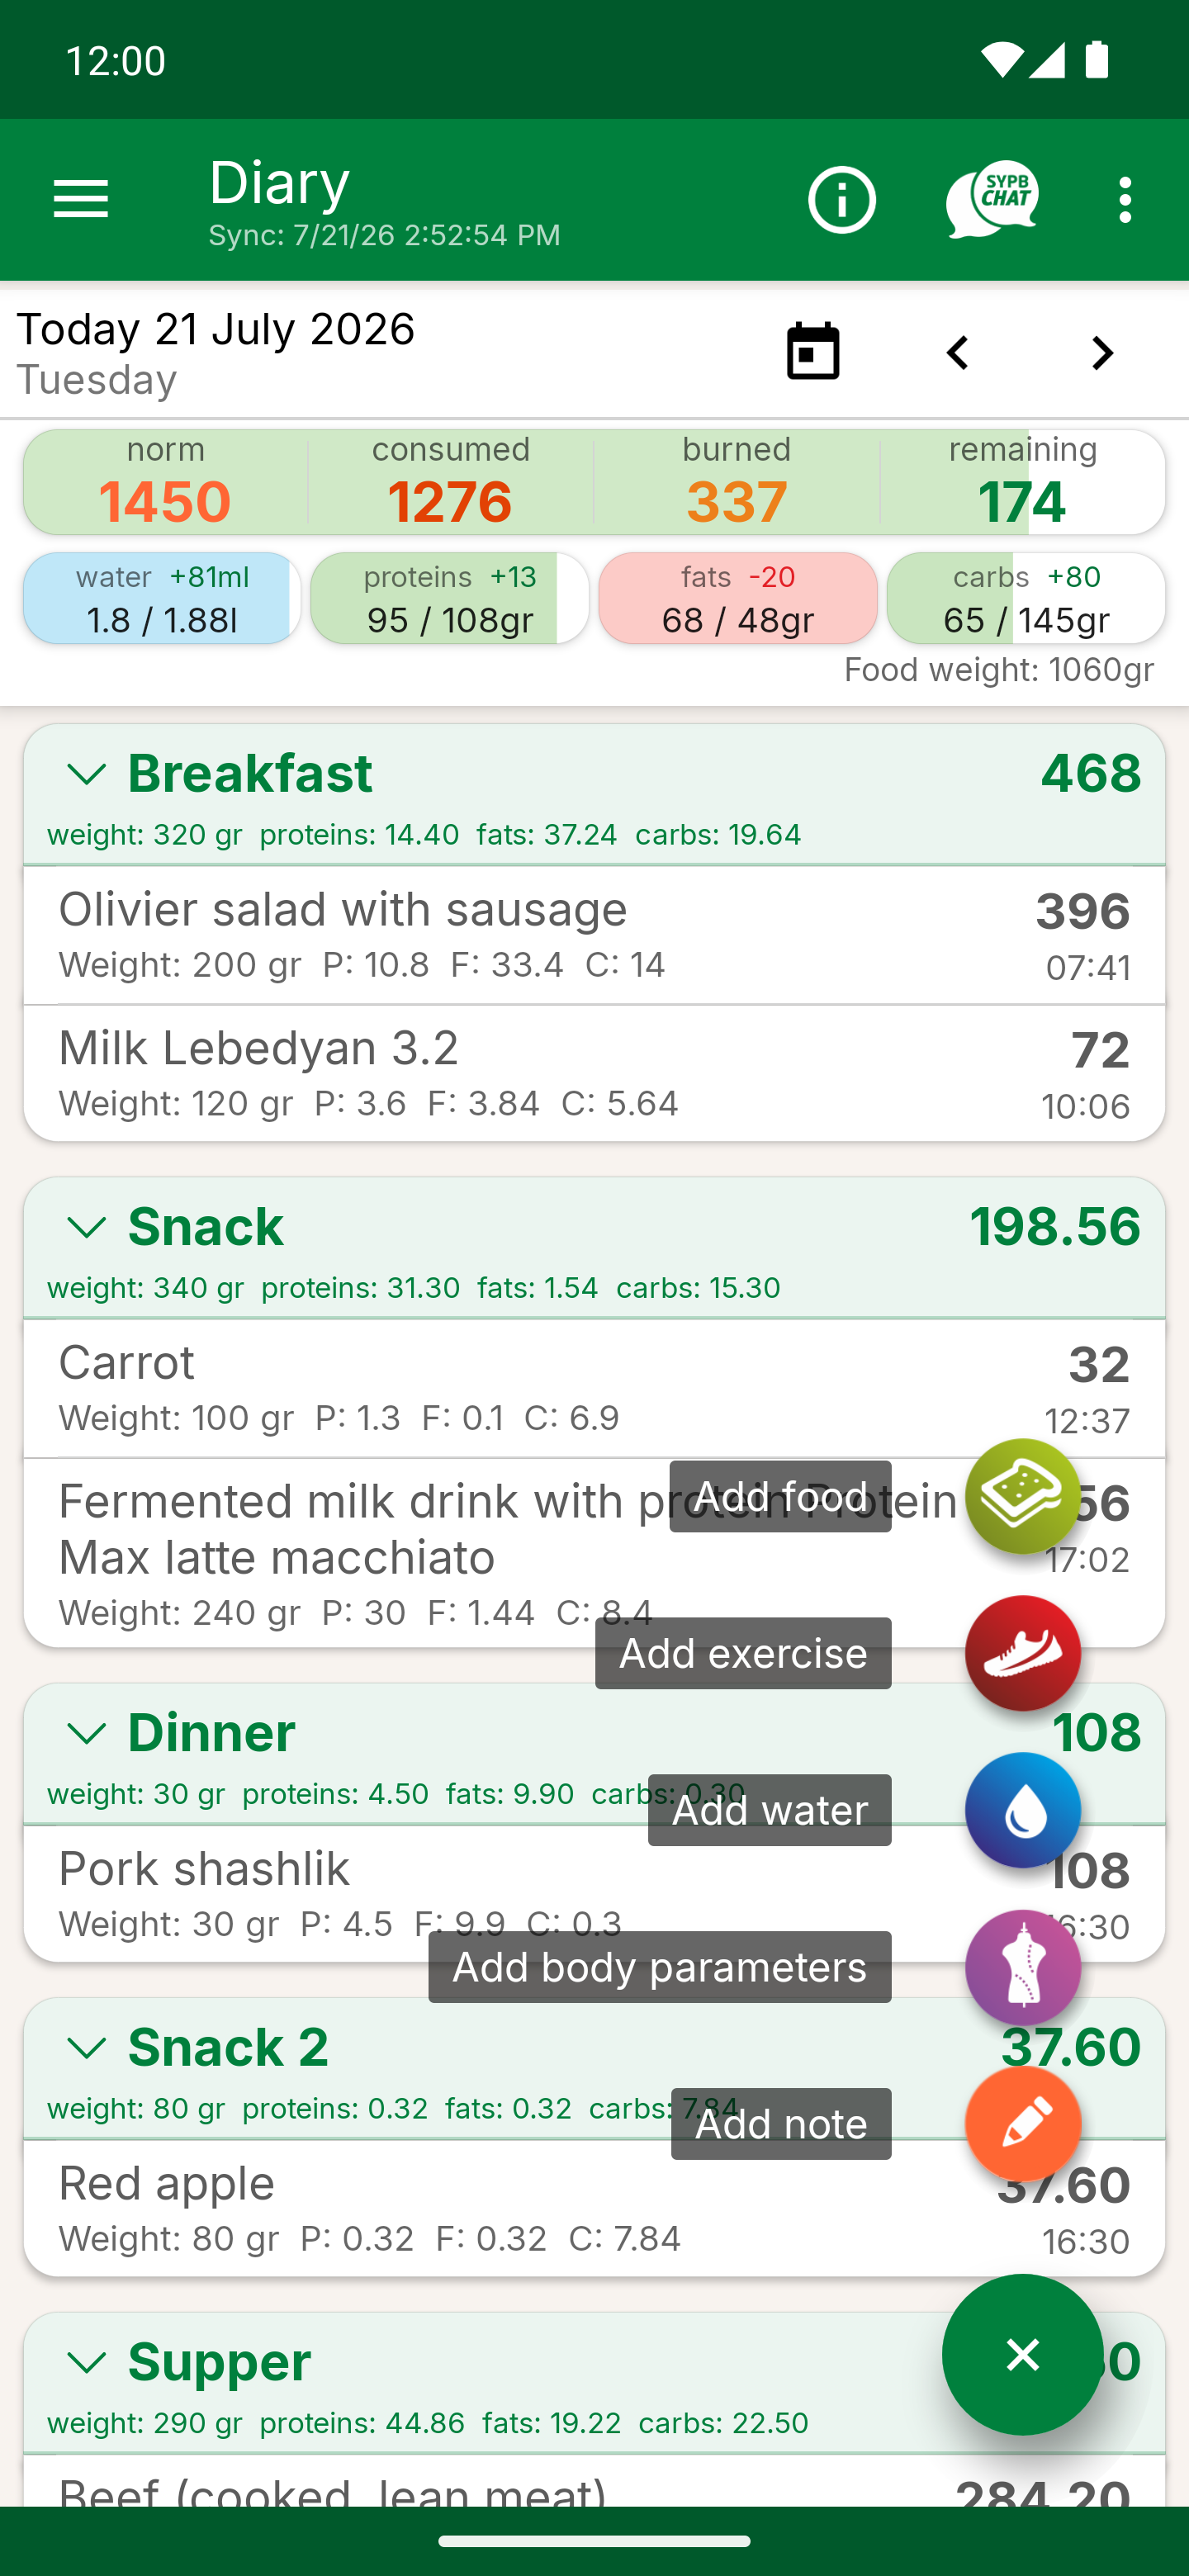
Tap "+" in the bottom right corner of the diary and a list of five items opens up.
8 How to add food
The action you will use most often in the app. Three steps: find the product → set the weight → add it.
Step 1. Find the product
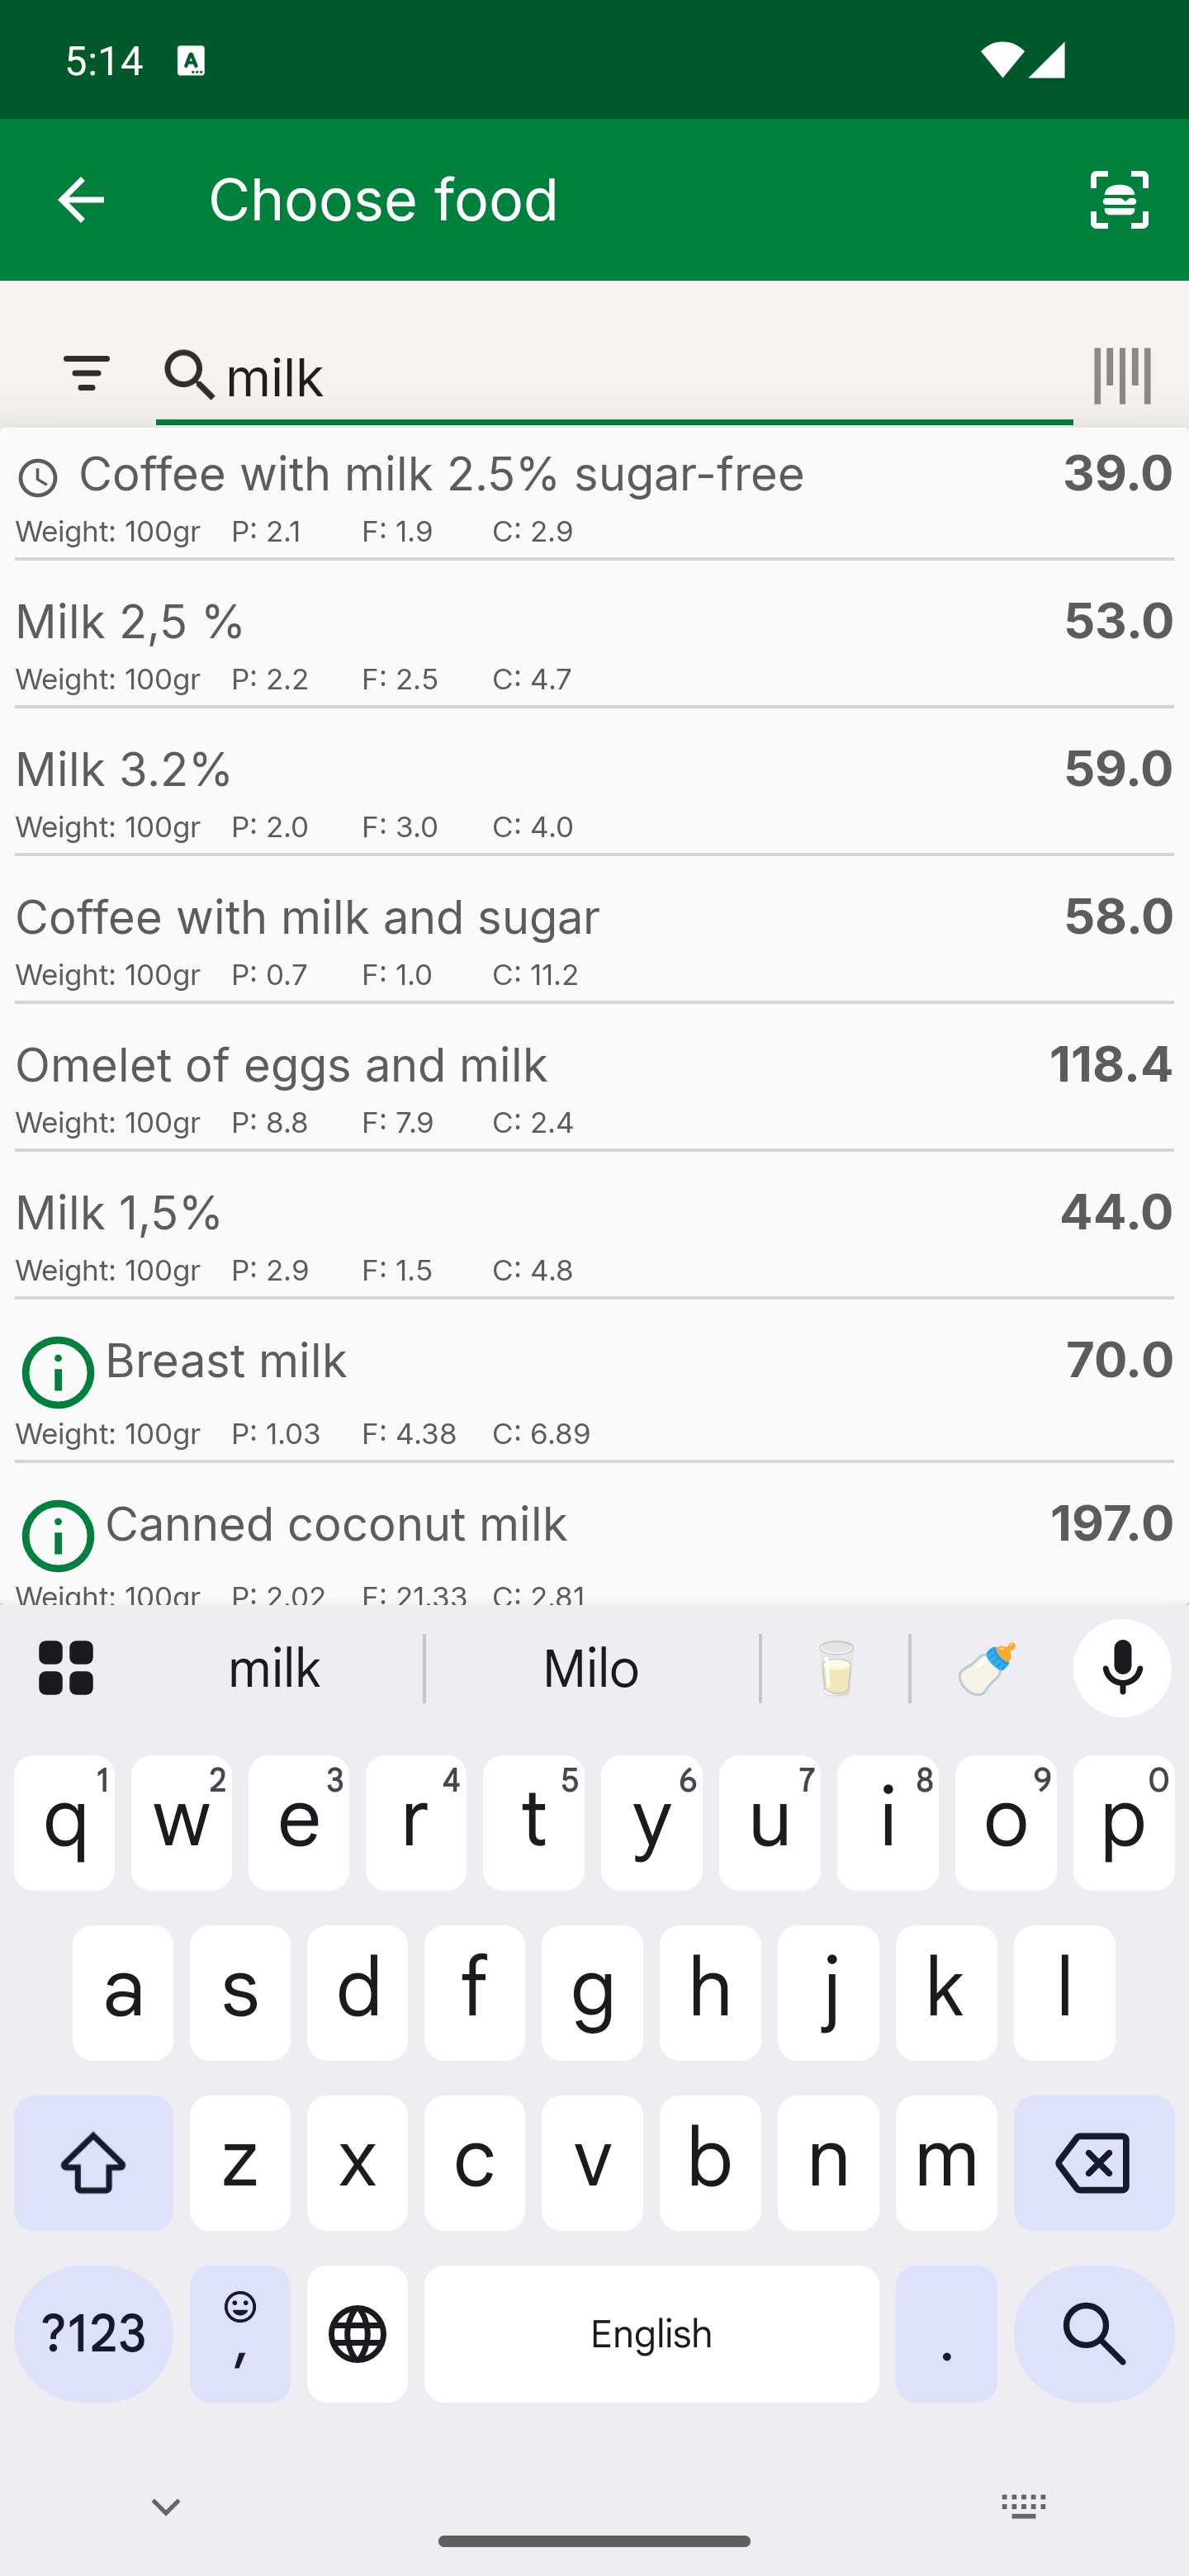
- 1Search bar - type the name of the product and the list is filtered automatically. To the left of the bar is the filter, to the right is barcode search.
- 2Scanning - the icon in the header opens the camera: scan a product barcode or take a photo of your food.
- 3Search results - under each name you see the serving weight and the PFC, and on the right the calories per 100 g. The "History" and "Favorites" tabs give you quick access to the things you eat all the time, and at the bottom of the screen there are the "Manual entry", "Create product" and "Create recipe" buttons.
- 4Filter — the ability to filter the list of products by content (in this case, showing only those with nutrients).
Step 2. Set the weight and the meal
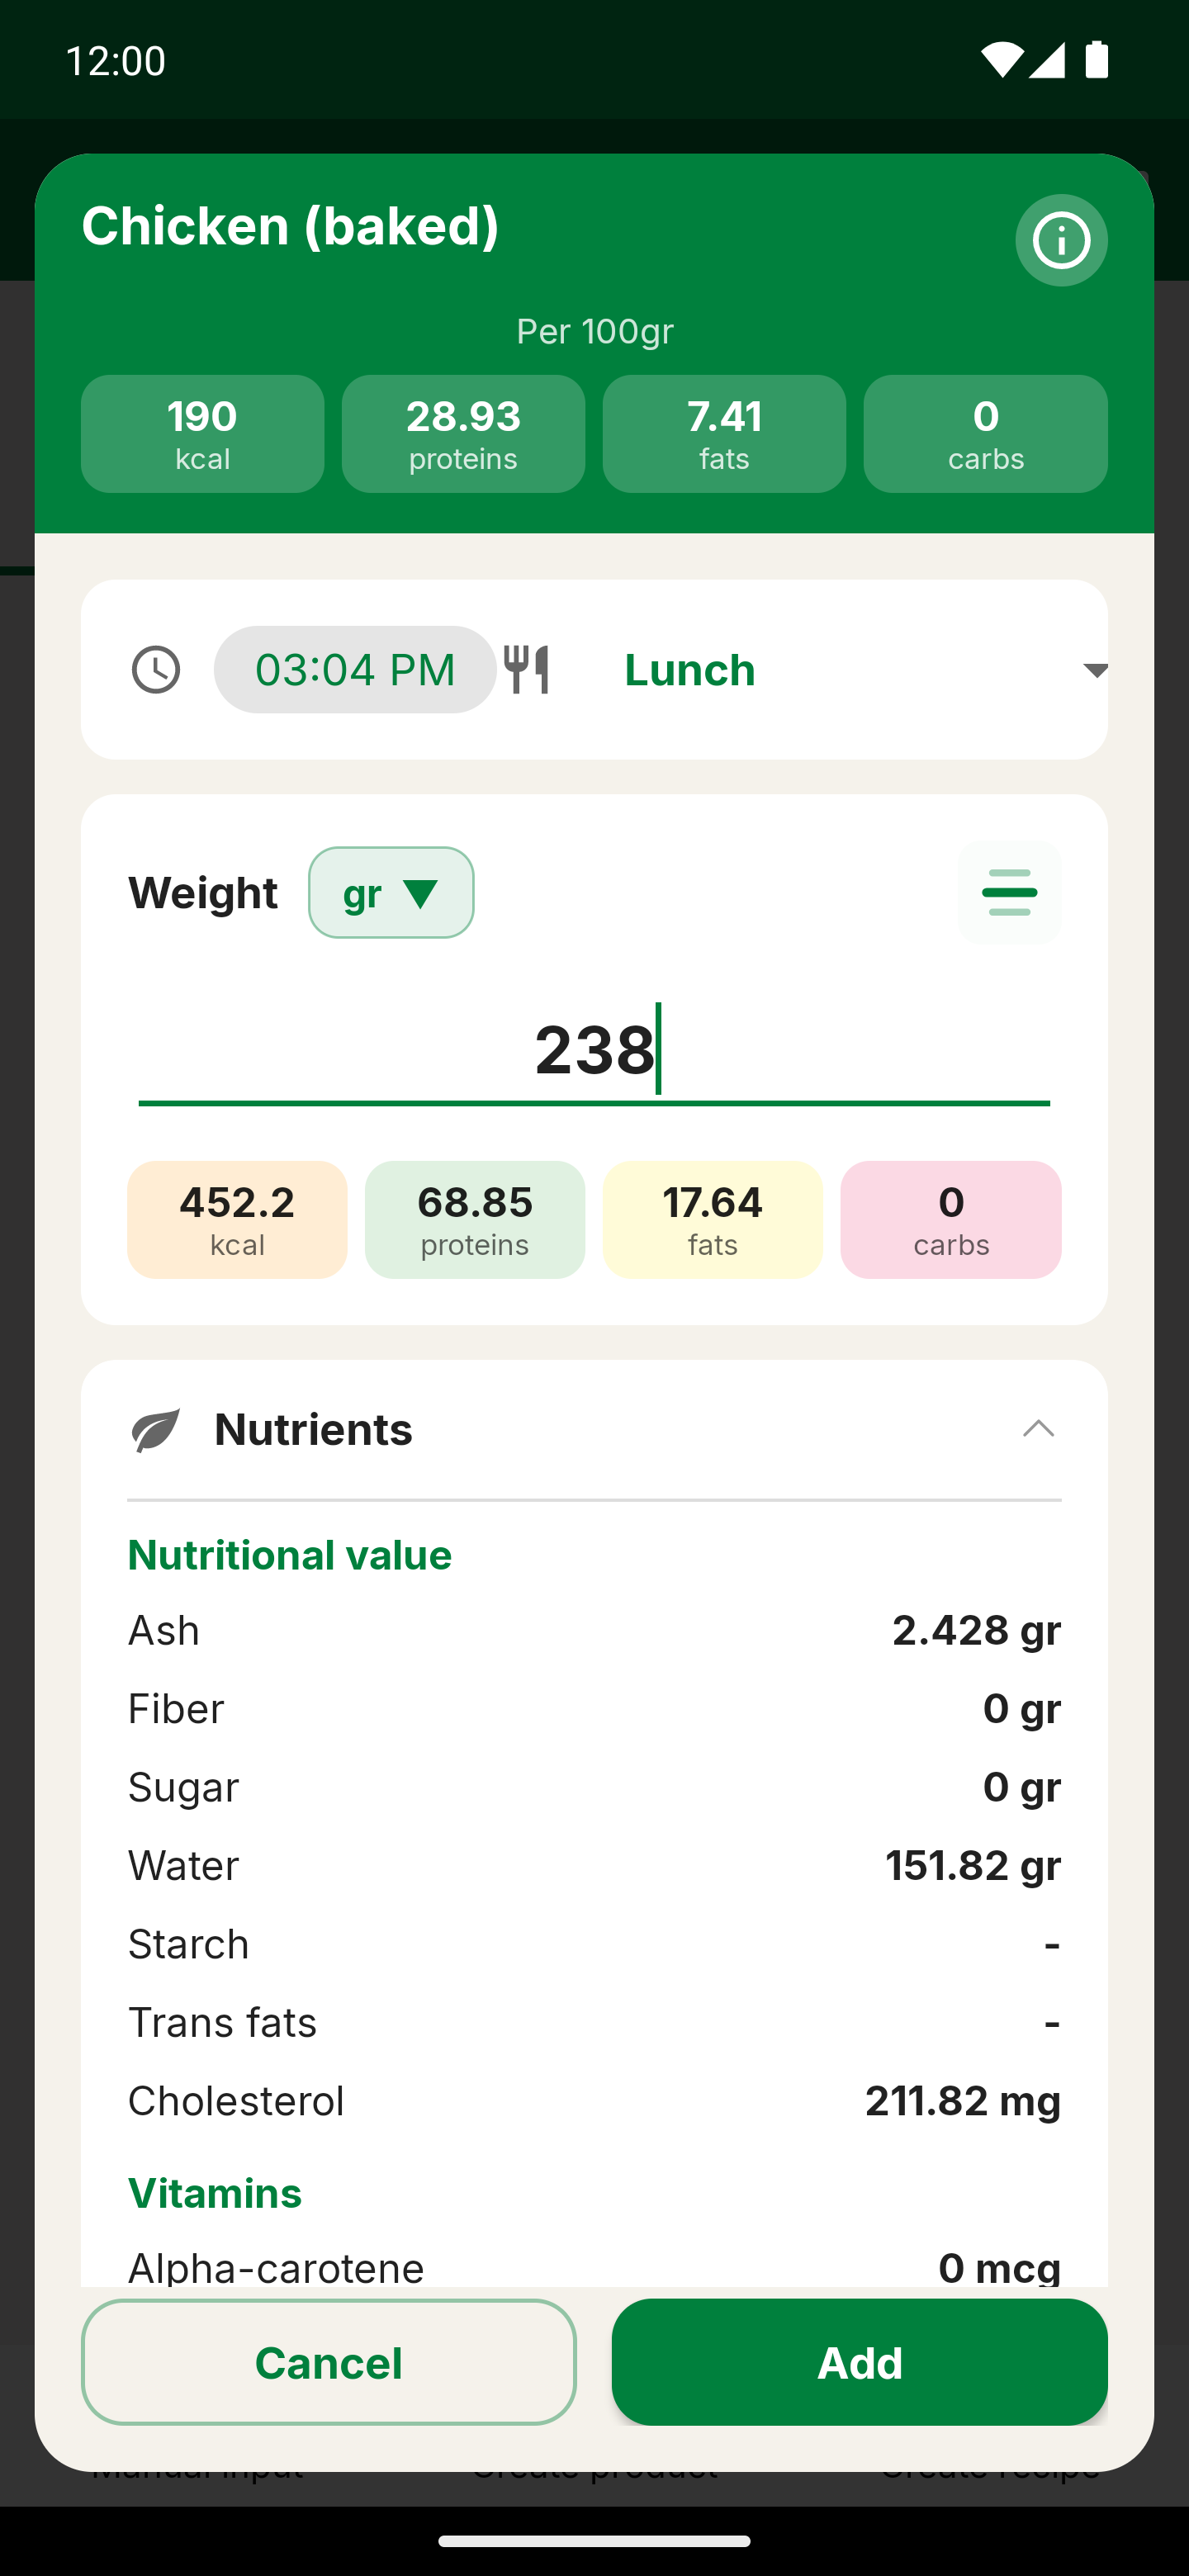
- 1Time - the current time is filled in automatically; change it if you need to.
- 2Meal - breakfast, snack, lunch, afternoon snack or dinner.
- 3Units - grams, milliliters, servings, pieces.
- 4Weight - the most important field. Enter the weight of the product from a scale, not by eye.
- 5Recalculation - calories and PFC are recalculated automatically for the weight you enter (the card header shows the values per 100 g for comparison).
- 6Nutrients - an expandable block: fiber, sugar, cholesterol, vitamins and minerals.
- 7The "Add" button - the entry goes into your diary.
9 Barcode scanner and food recognition from a photo
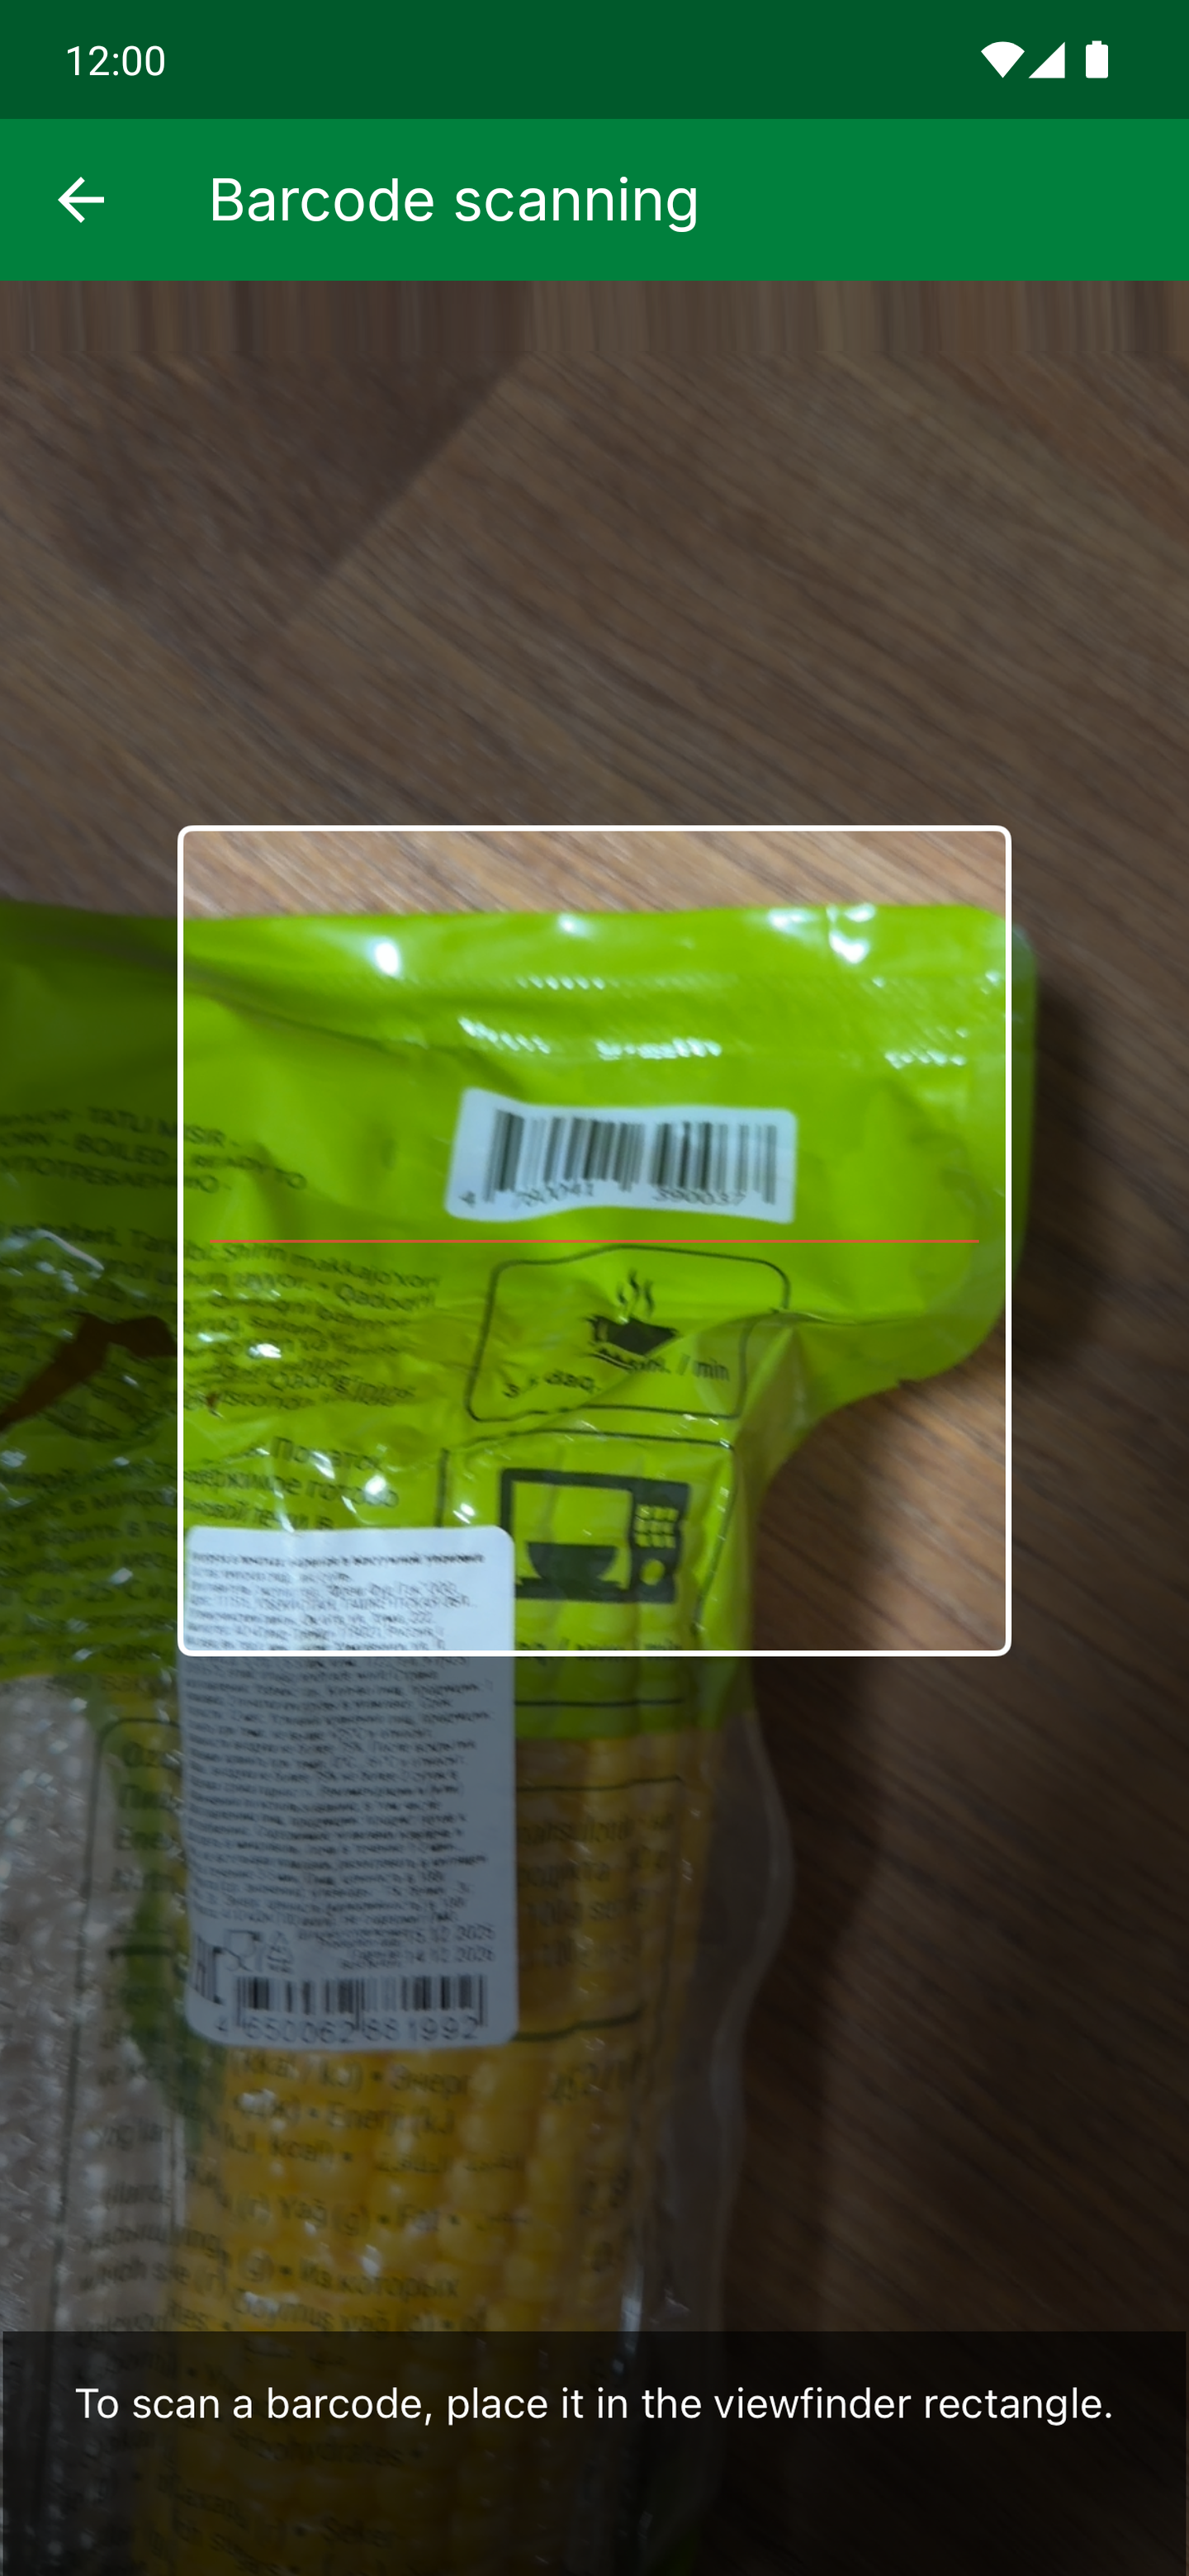
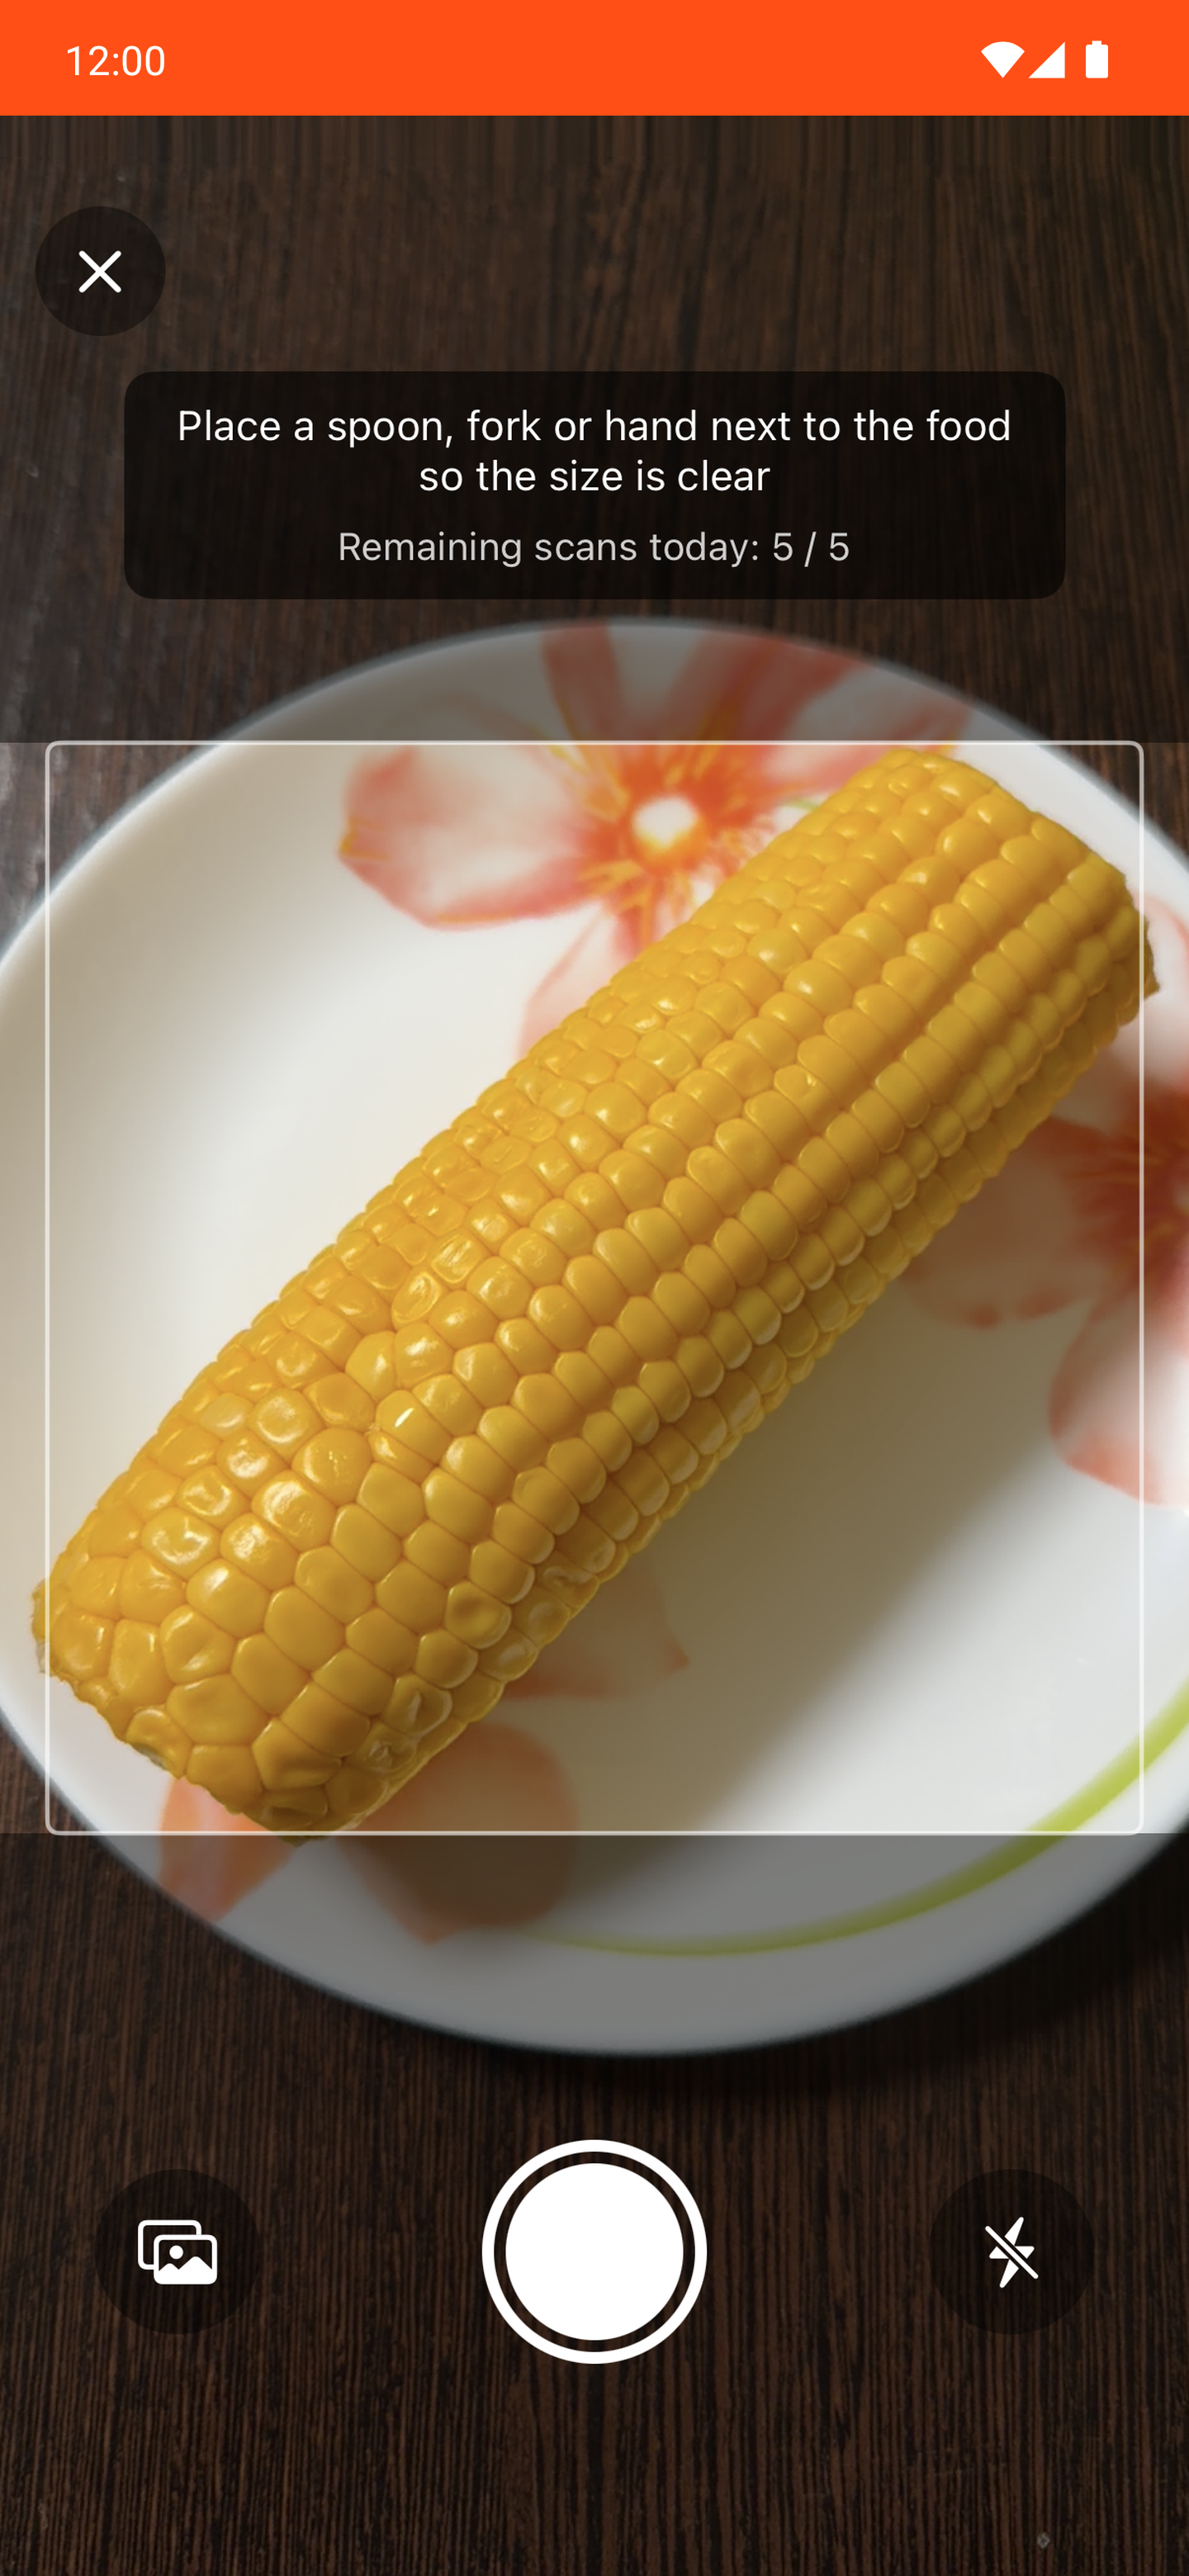
Two quick ways to log a food without typing its name by hand.
10 Recipes: how to log complex dishes
If you cook for yourself, do not look for a similar dish in the database. Your borscht and the one from the database will have different calorie counts. Create the recipe once and use it all the time.
Side menu → "My recipes" → "+" in the bottom right corner. Or straight from the food selection screen - the "Create recipe" button.
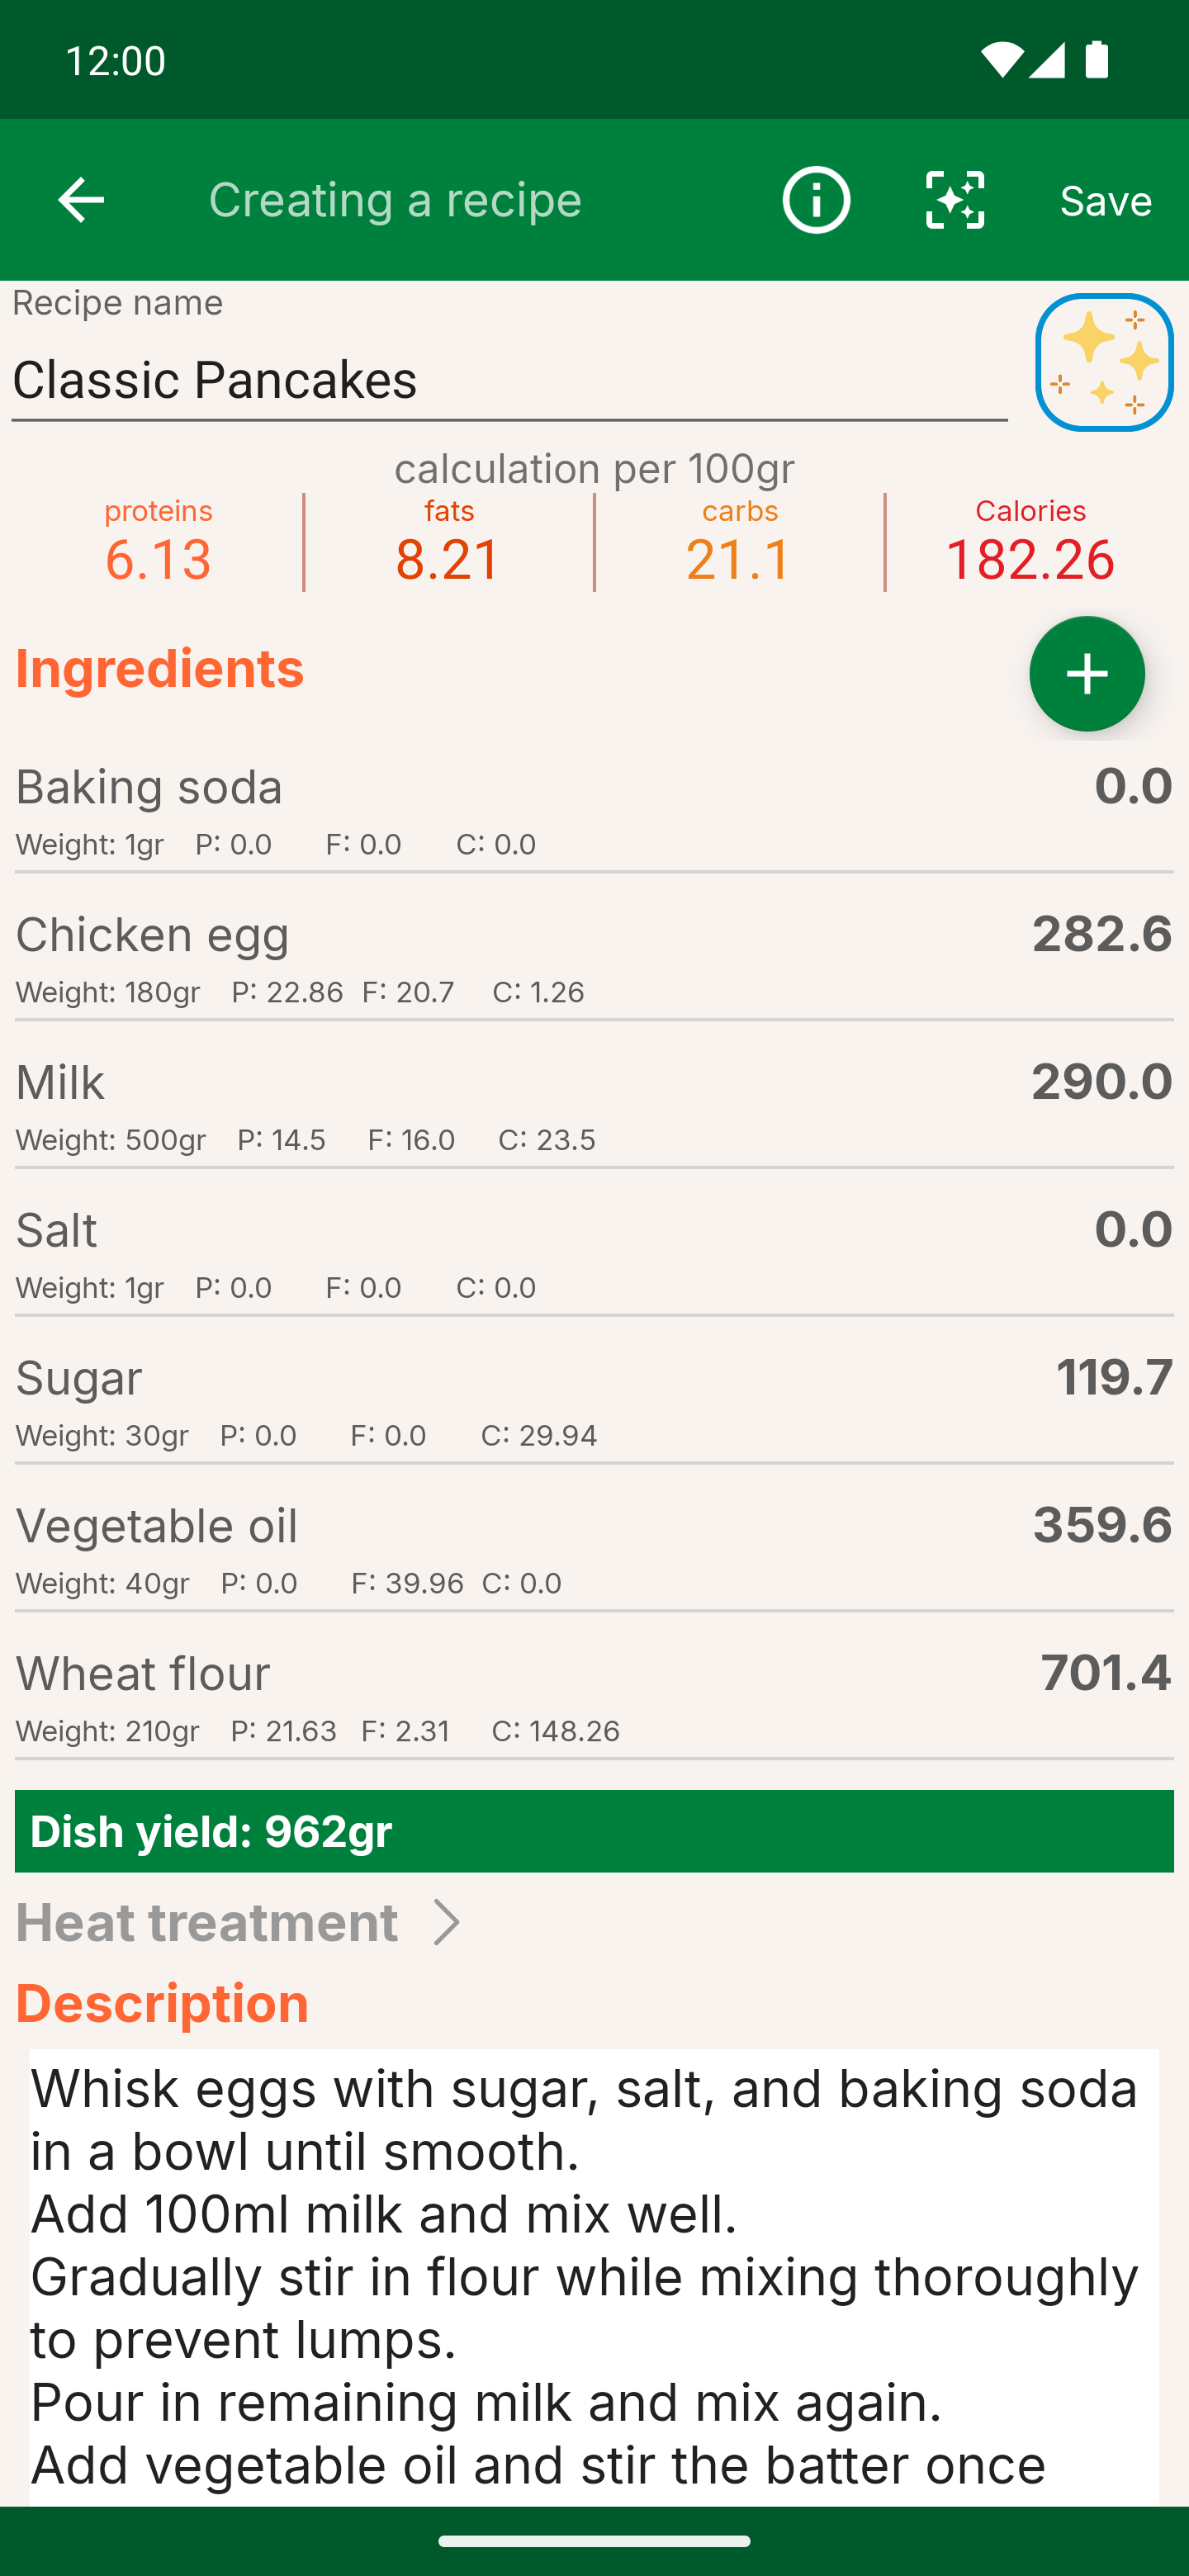
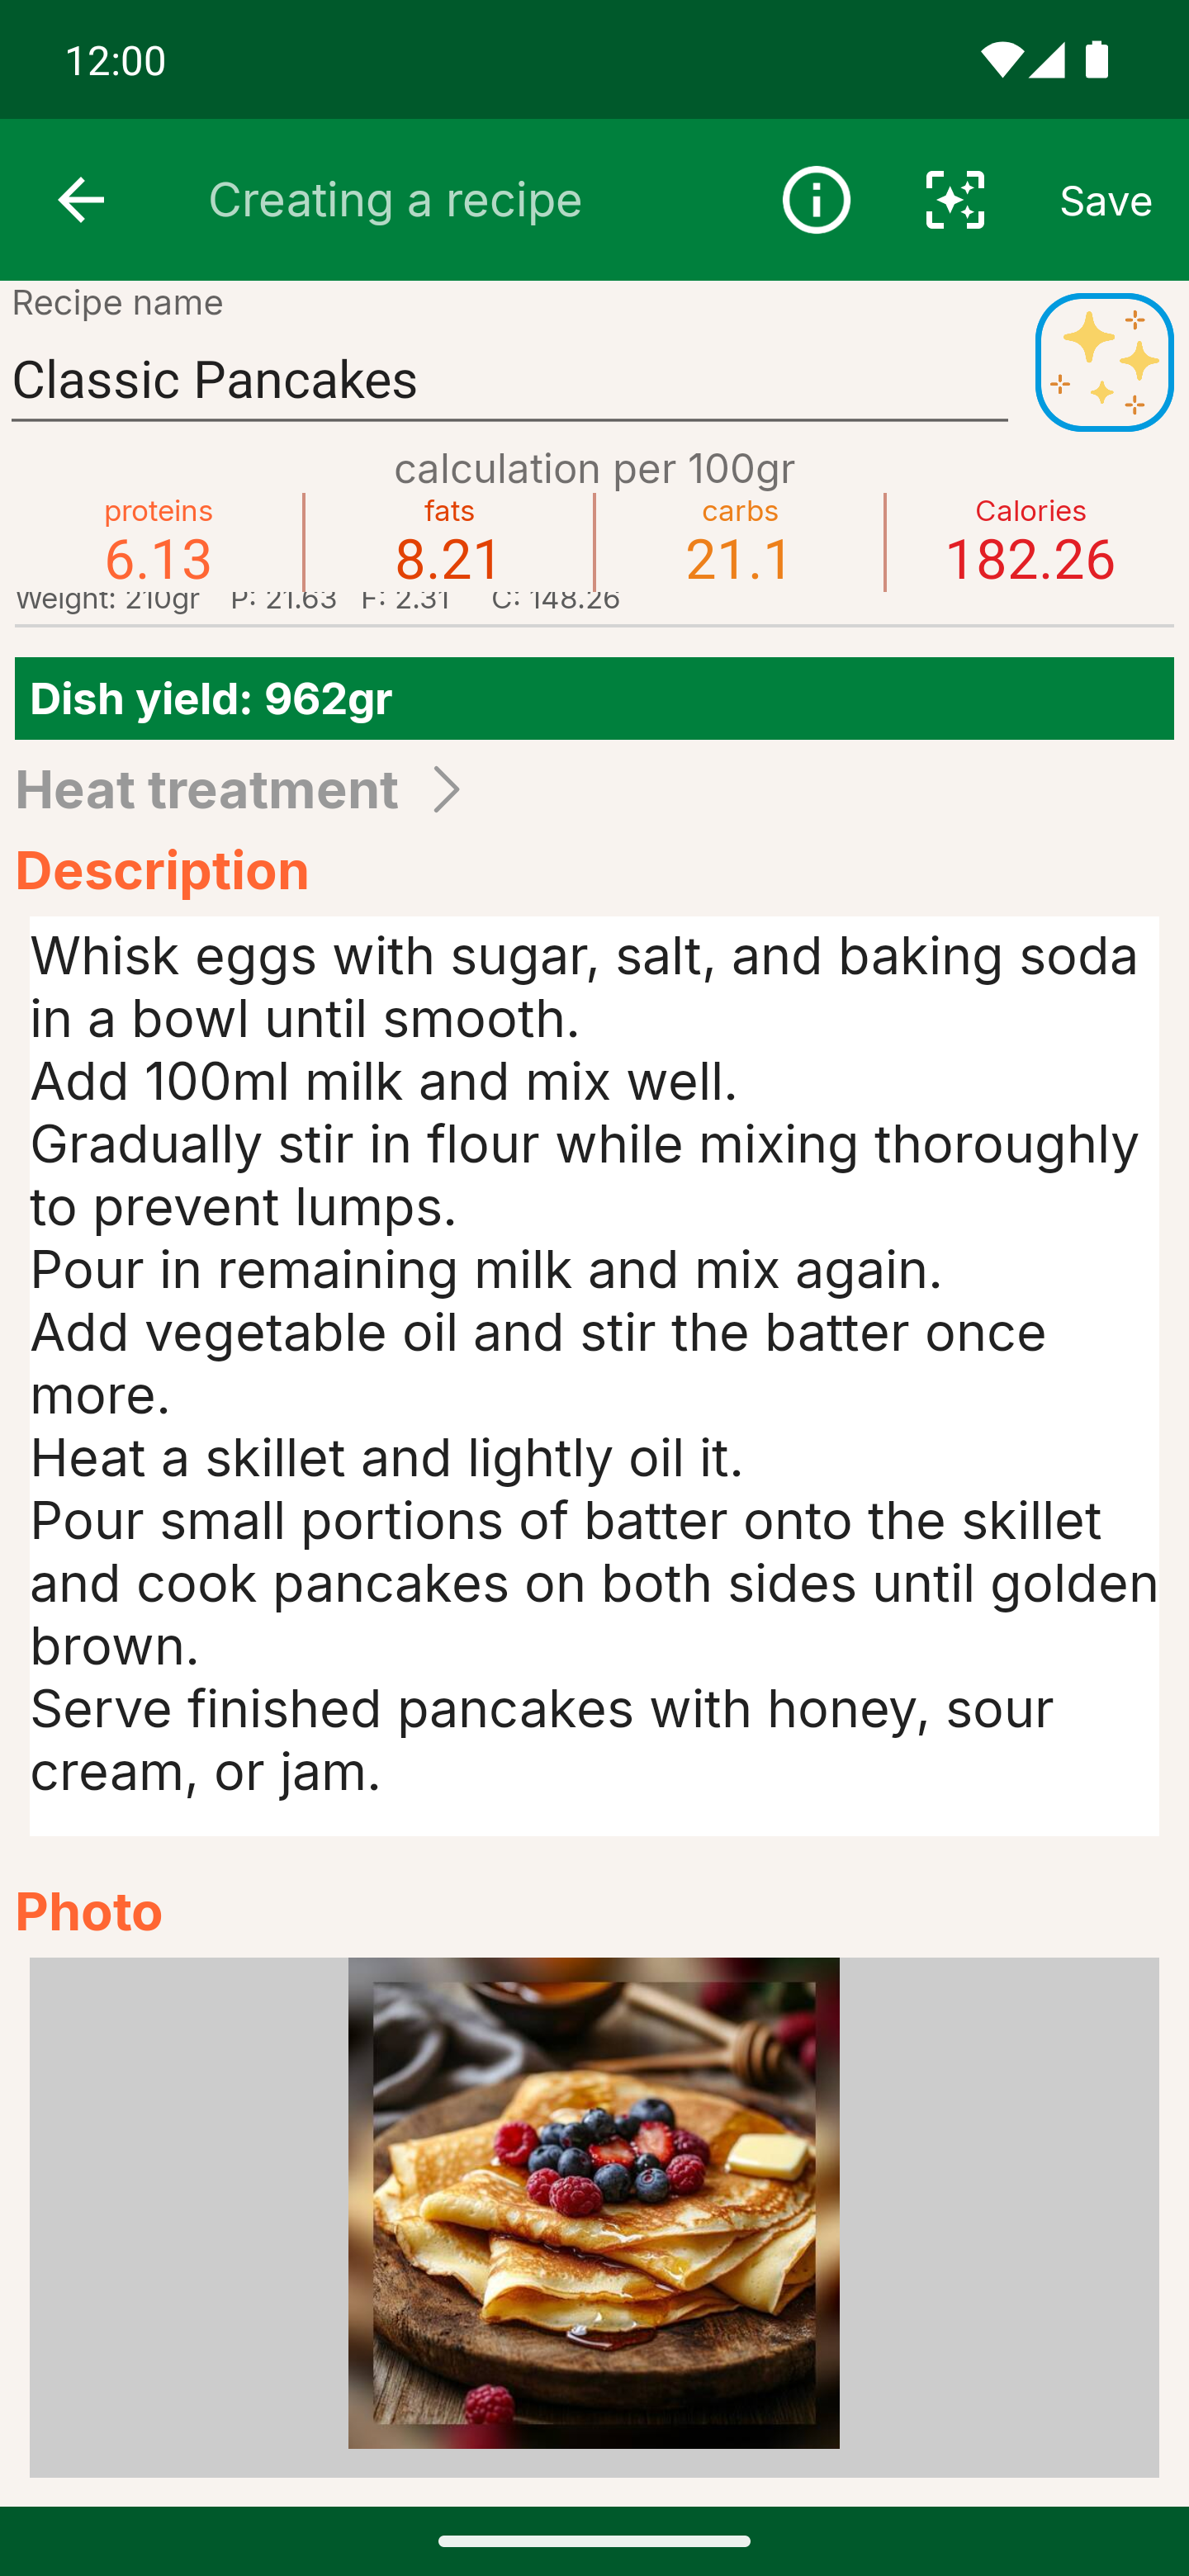
- 1Recipe name - what the dish will be called in your list.
- 2Assistant - the button with the "sparkles" helps you fill in the recipe automatically.
- 3Calculation per 100 g - the app works out the PFC and the calories of the finished dish for you.
- 4The "+" button - add ingredients.
- 5Ingredients list - every product with its raw weight and its PFC.
- 6Dish yield - the weight of the dish after cooking. Weigh the pot or the baking tray with the cooked food and enter the result, subtracting the weight of the empty dish first.
- 7Save - do not forget to tap it, otherwise the recipe will not be saved.
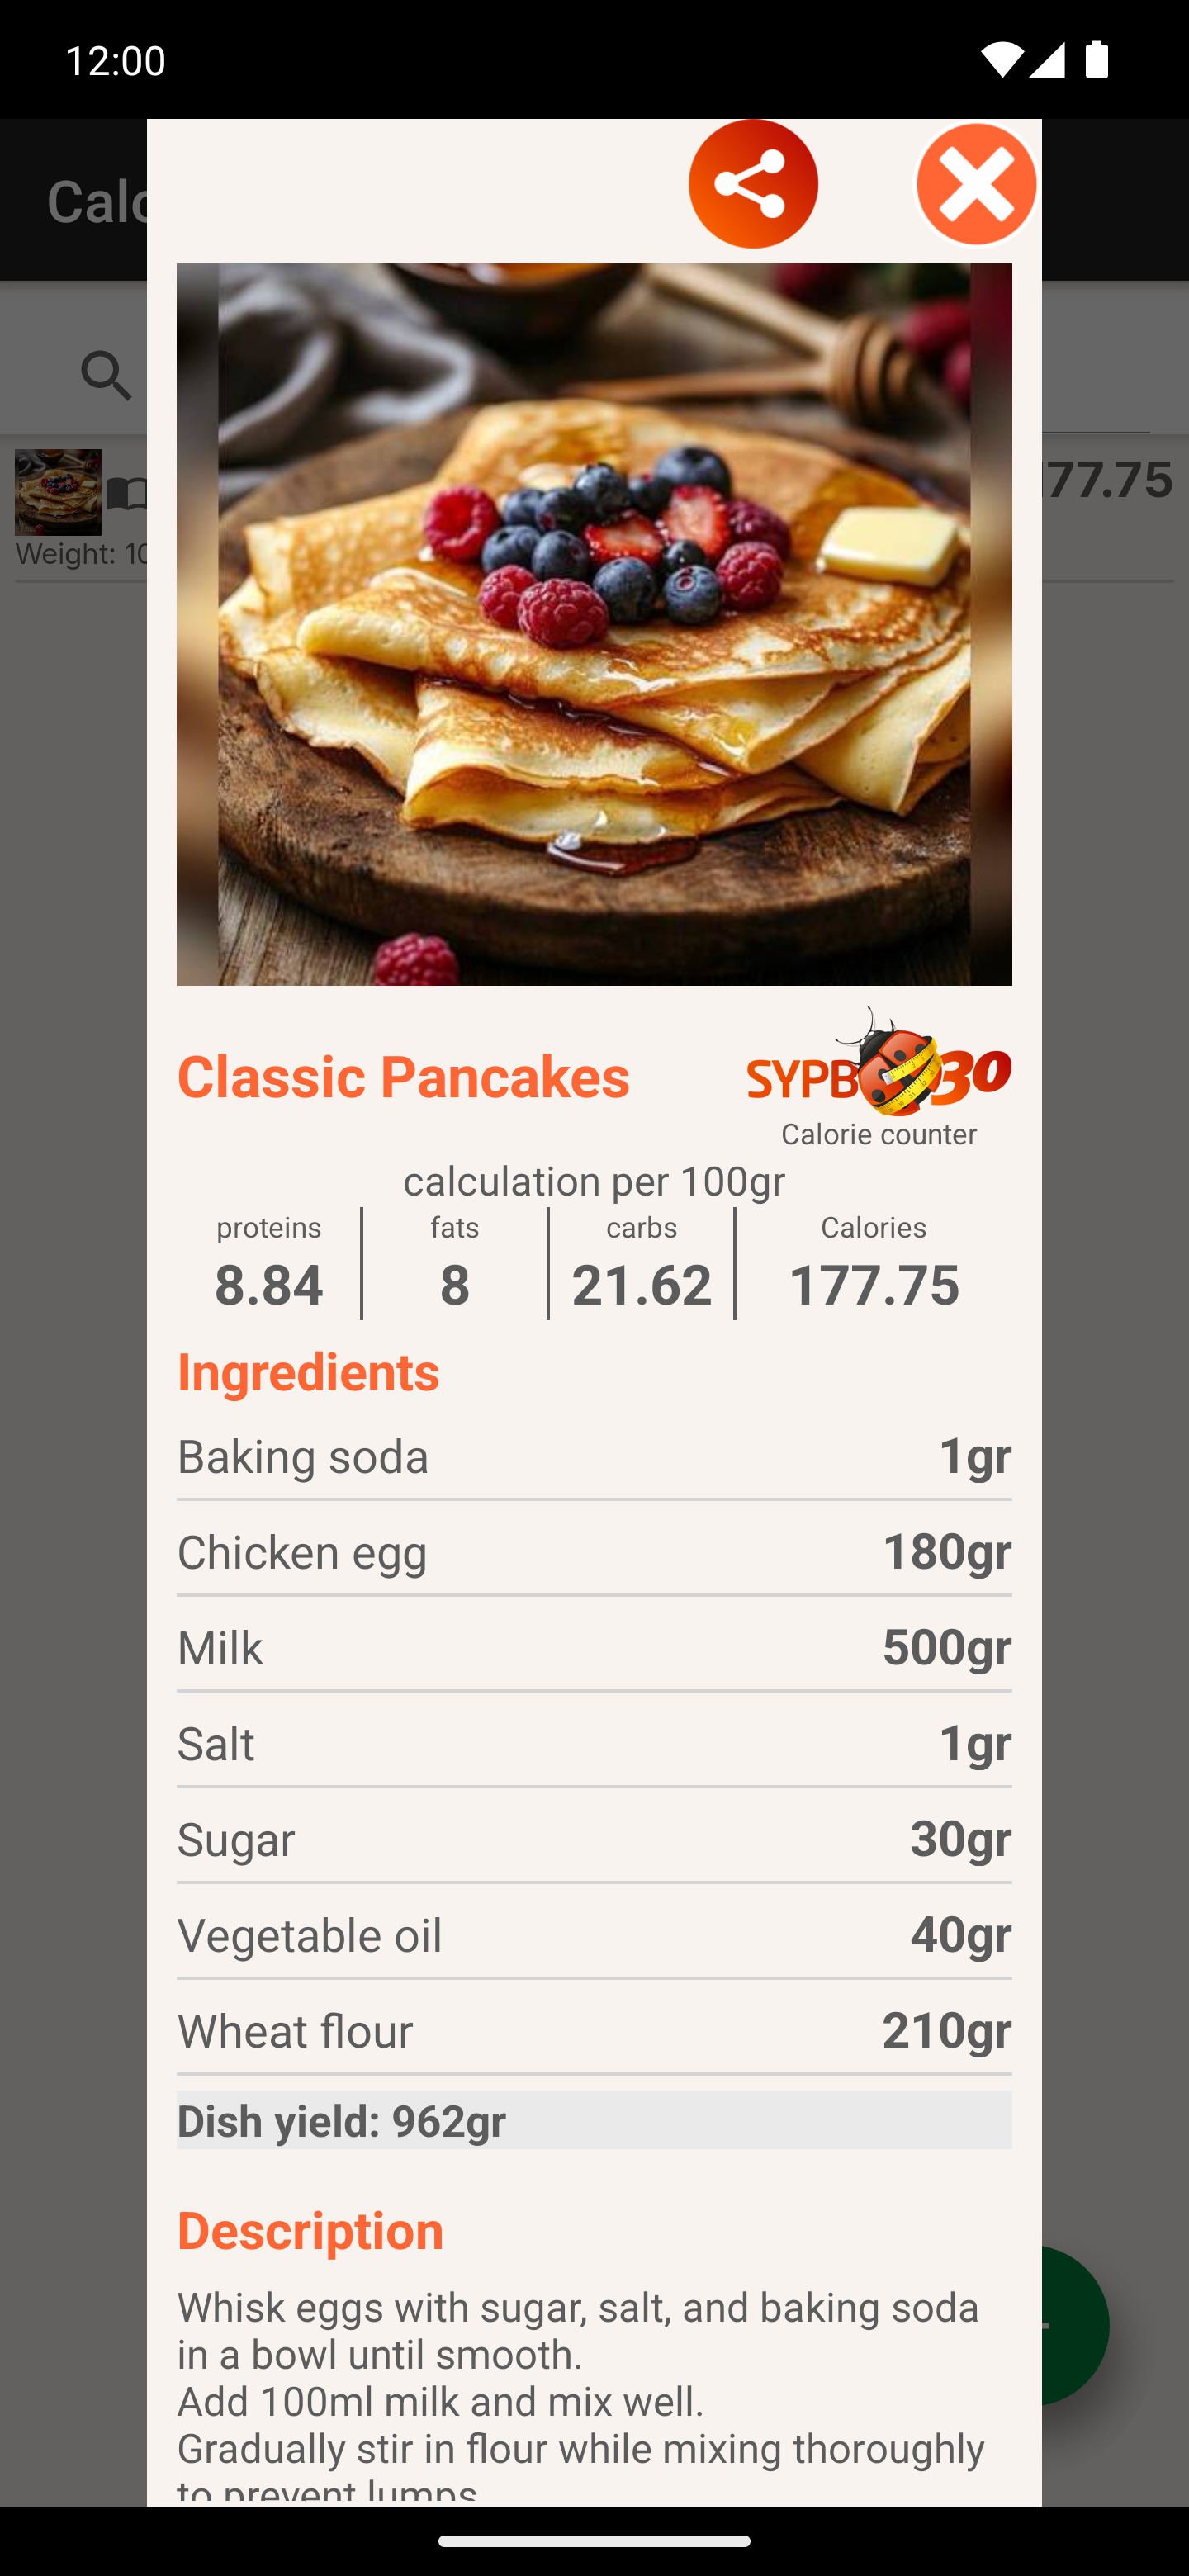
- 1Share - send the recipe to friends or to a chat.
- 2Dish photo - the one you added while creating the recipe.
- 3Calories and PFC per 100 g - the final figures: proteins, fats, carbs, calories.
- 4Ingredients - the full list with the weight of every product.
- 5Dish yield - the weight of the cooked dish that your portion is calculated from.
11 Weight, measurements, water and steps
Food is only half of the job. The other half is logging your results regularly.
How to log your weight
- Open the diary for the day you need.
- Tap "+" → "Add body parameters".
- Enter your weight and, if you want, your measurements: neck, chest, arm, wrist, waist, belly, hips, upper leg, calf muscle.
- Save. The entry will show up in the "Parameters" block at the bottom of the diary and on the Statistics charts.
How to log water
"+" → "Add water" → enter the amount. Your water target is calculated in your Profile and shown in the top bar of the diary.
How to log exercise and steps
"+" → "Add exercise" → pick the type of activity and the duration. Steps can be entered by hand or synced from your phone. The step goal is set in your Profile.
12 Statistics
Side menu → "Statistics". Five tabs that show you the trend rather than one single day.
History
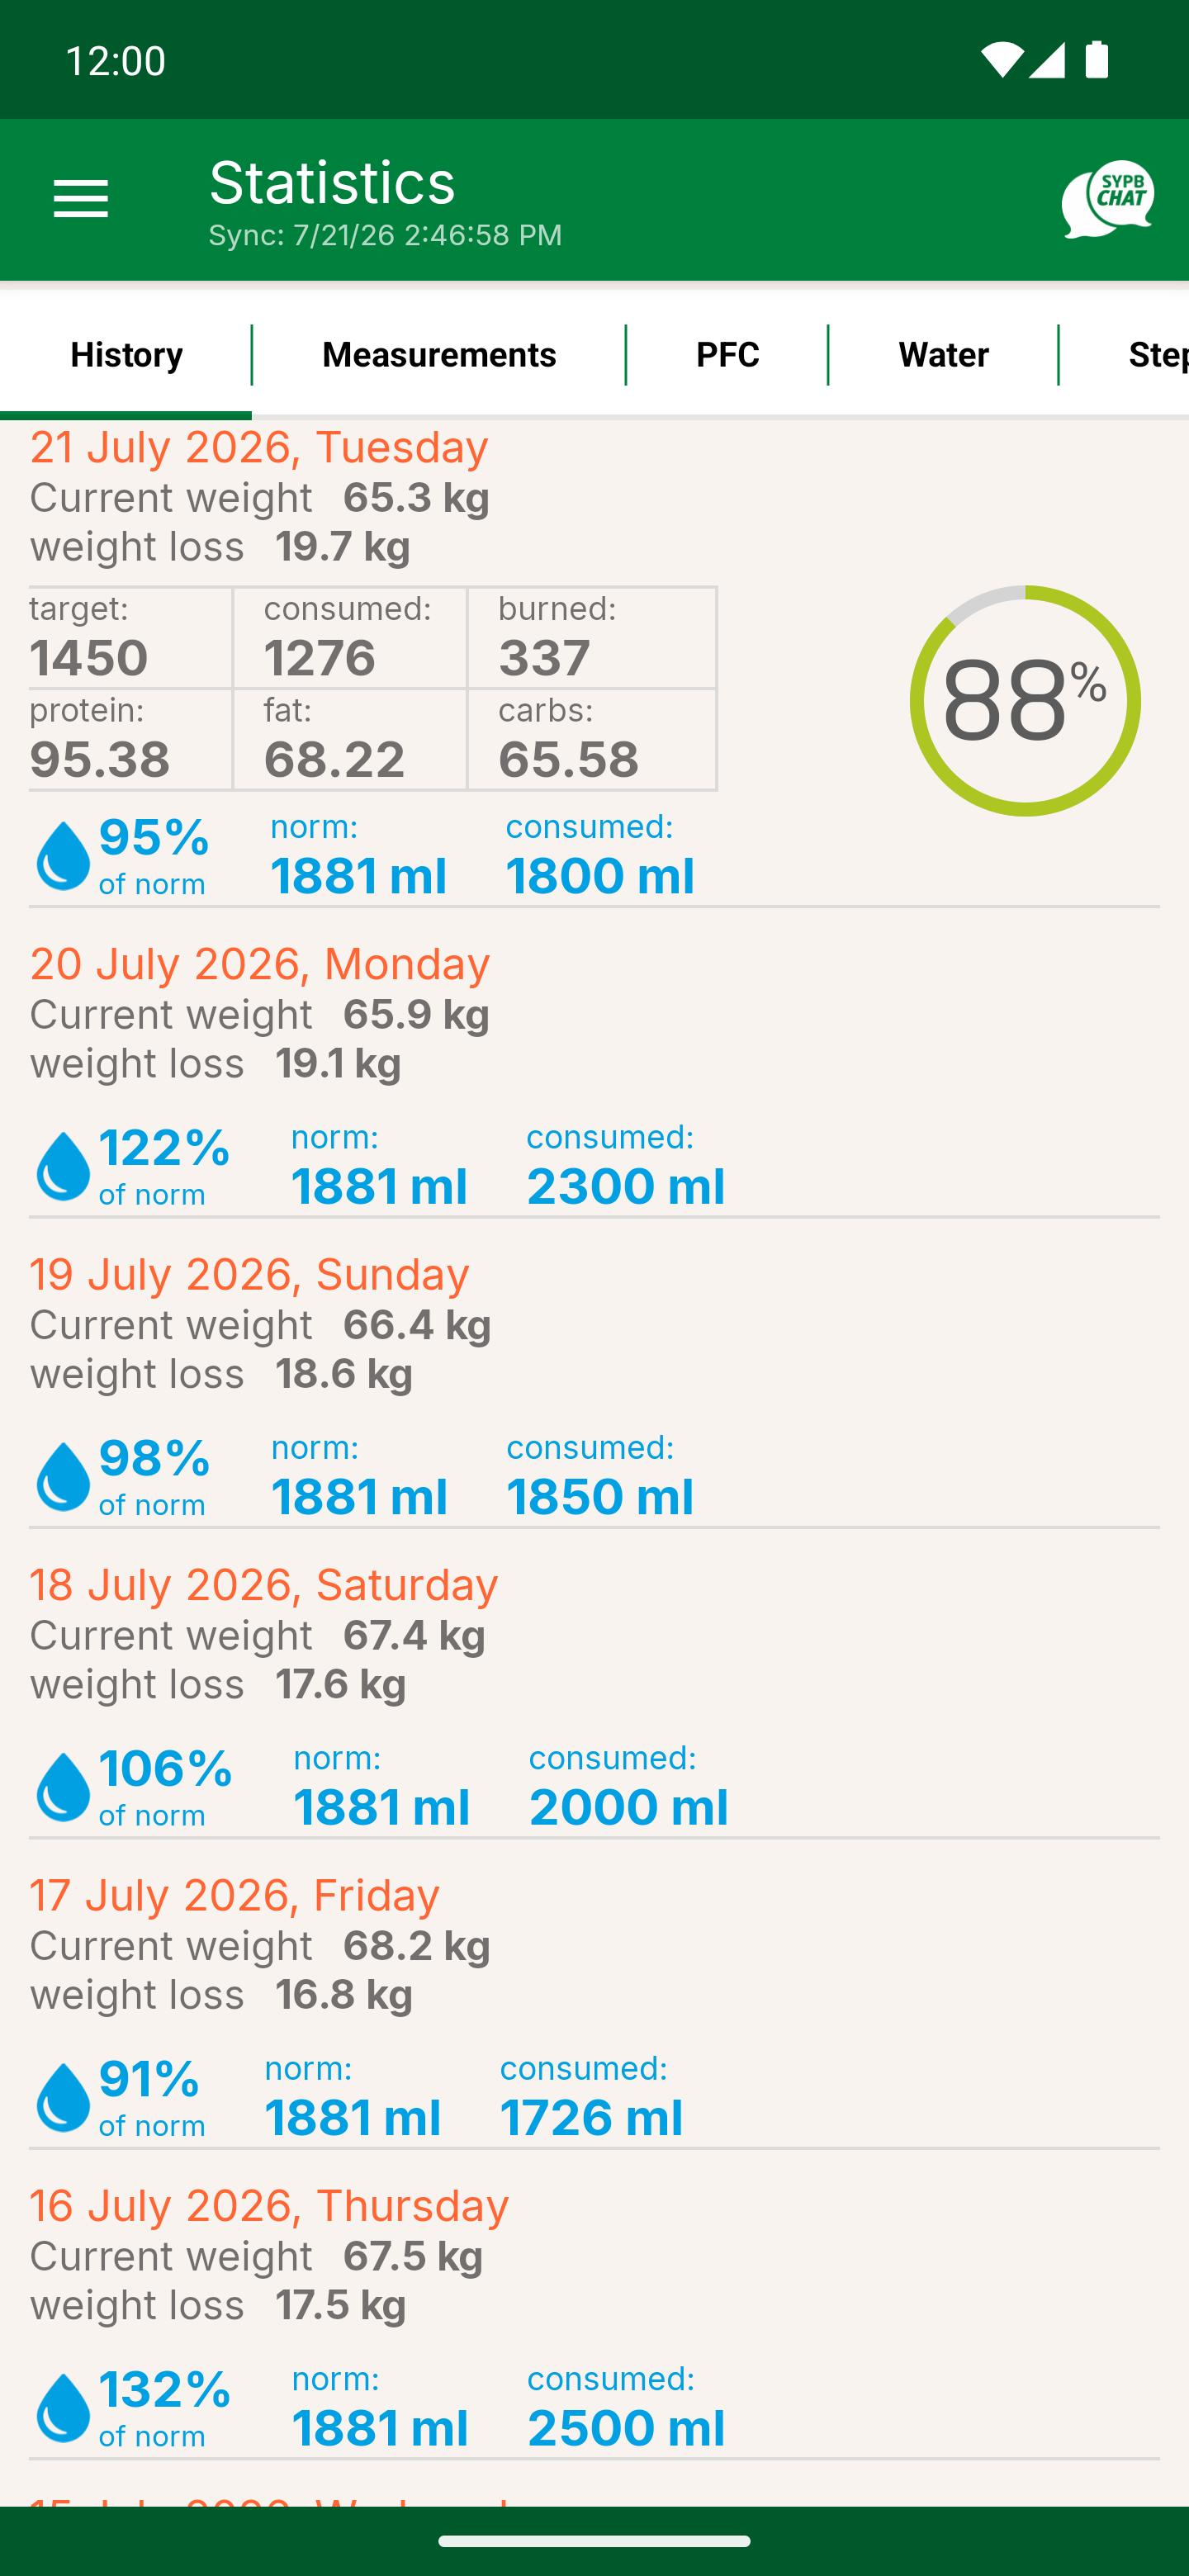
- 1Tabs - History, Measurements, PFC, Water, Steps, Nutrients.
- 2Current weight and weight loss - for every day you can see how much you have lost since the start.
- 3Circular indicator - how much of your daily calorie norm you have used, in percent.
- 4Water - the percentage of the norm, the norm itself and how much you have drunk.
Measurements
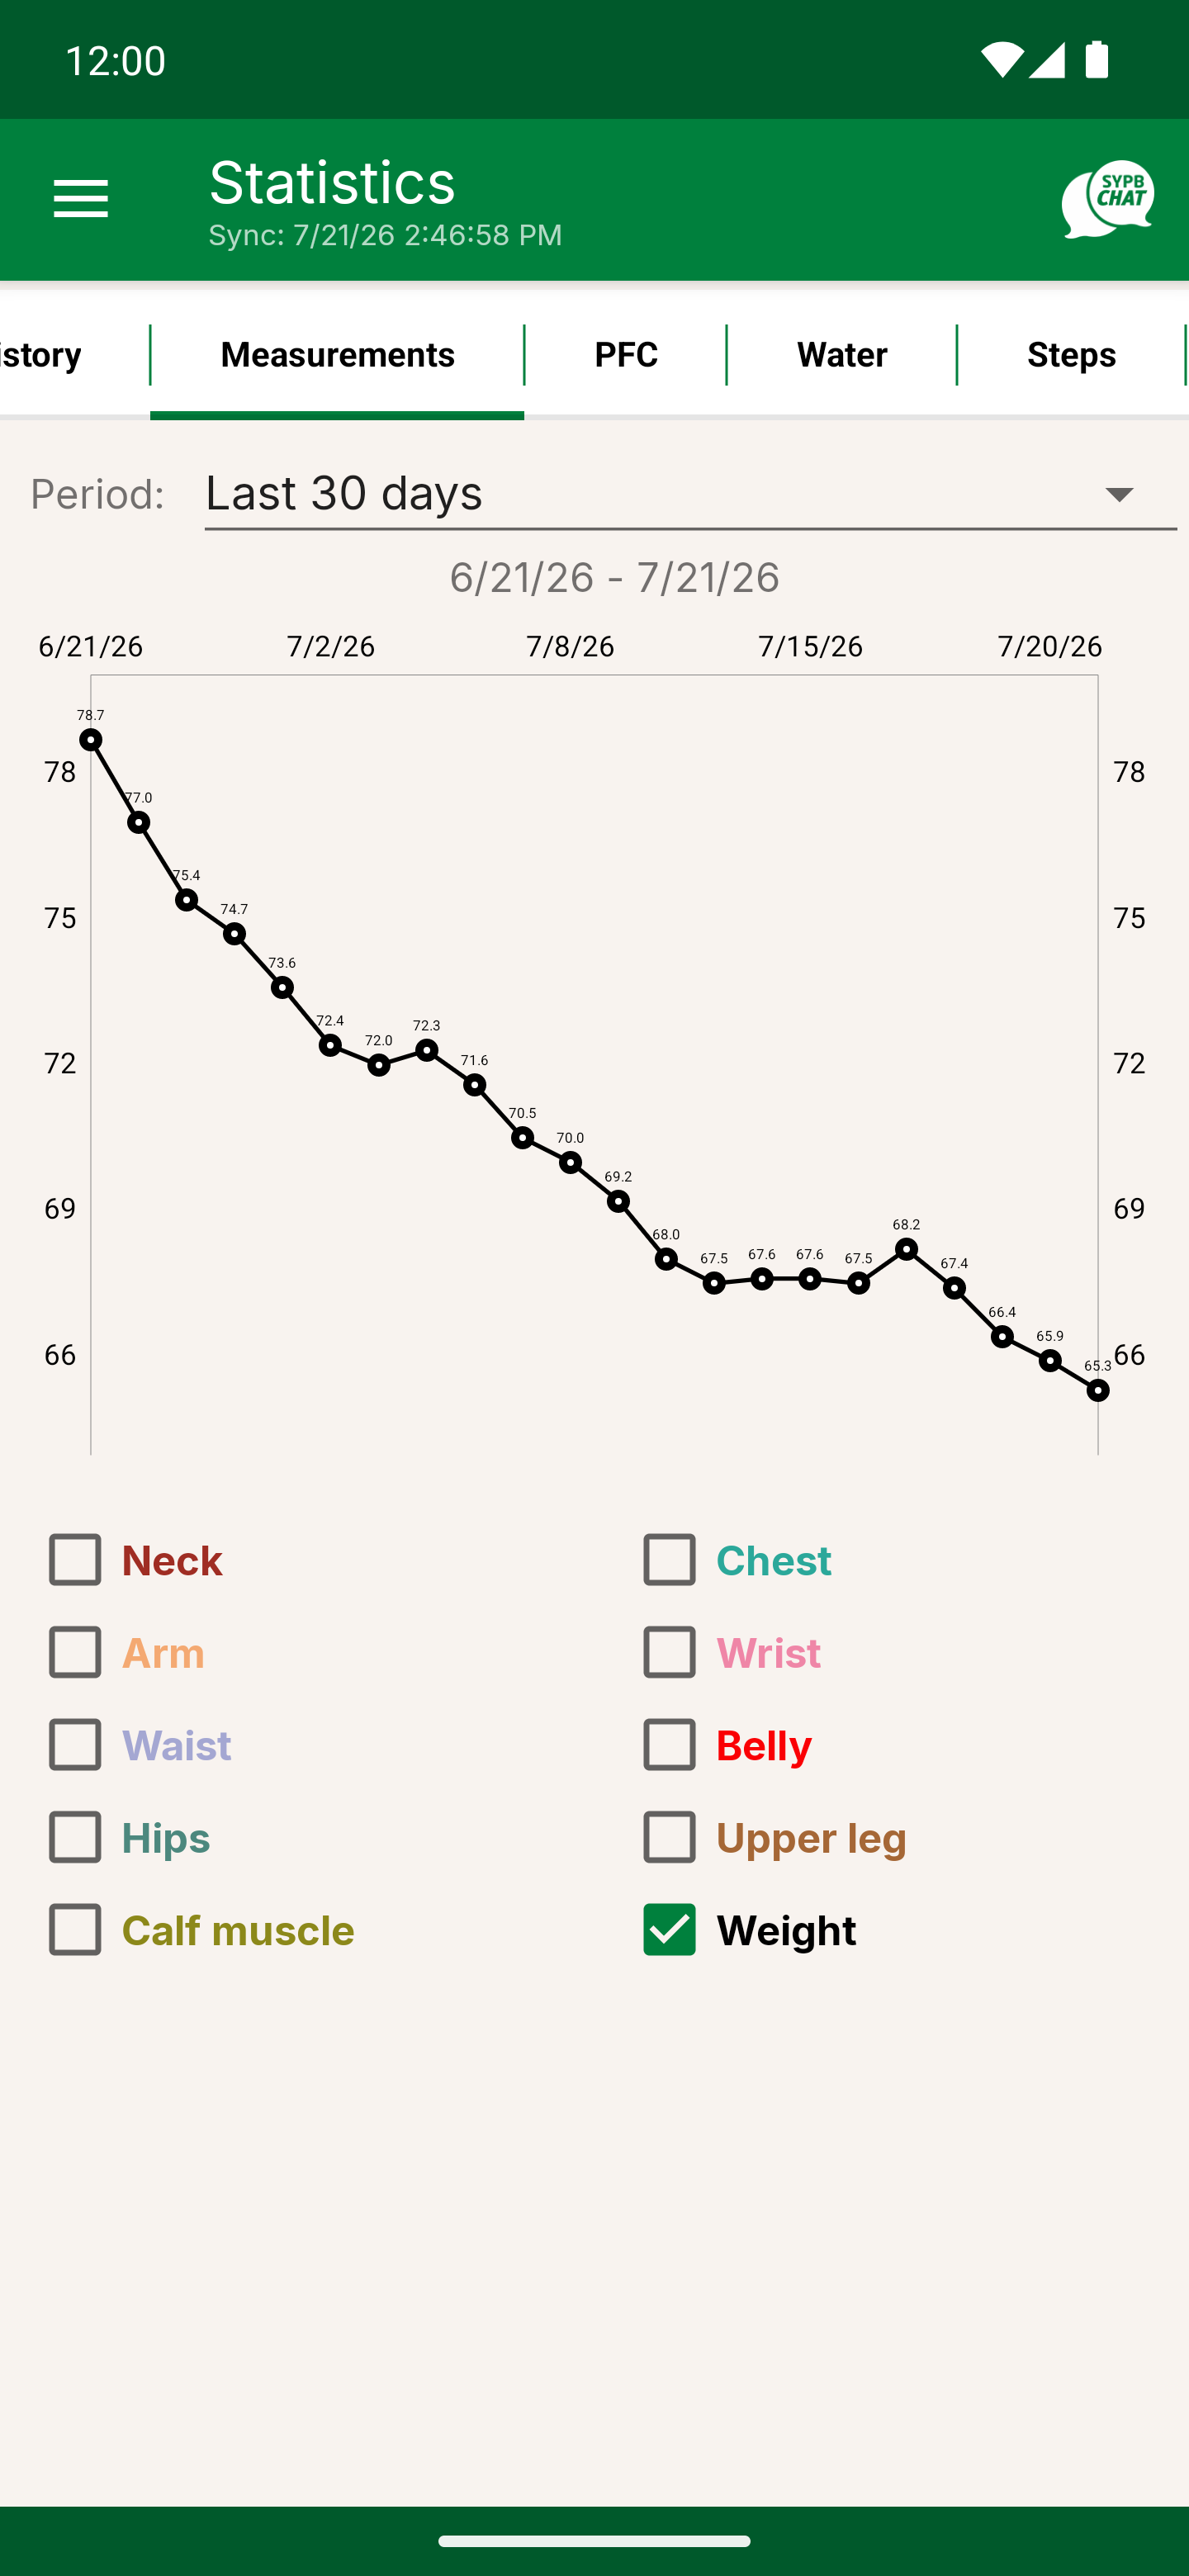
- 1Period - 7 days, 30 days or a custom range.
- 2Chart - the trend with the value labelled at every point. You can clearly see that weight does not go down in a straight line but in "steps", and that is perfectly normal.
- 3Body parameters - tick the ones you want to show on the chart.
- 4Weight - ticked by default.
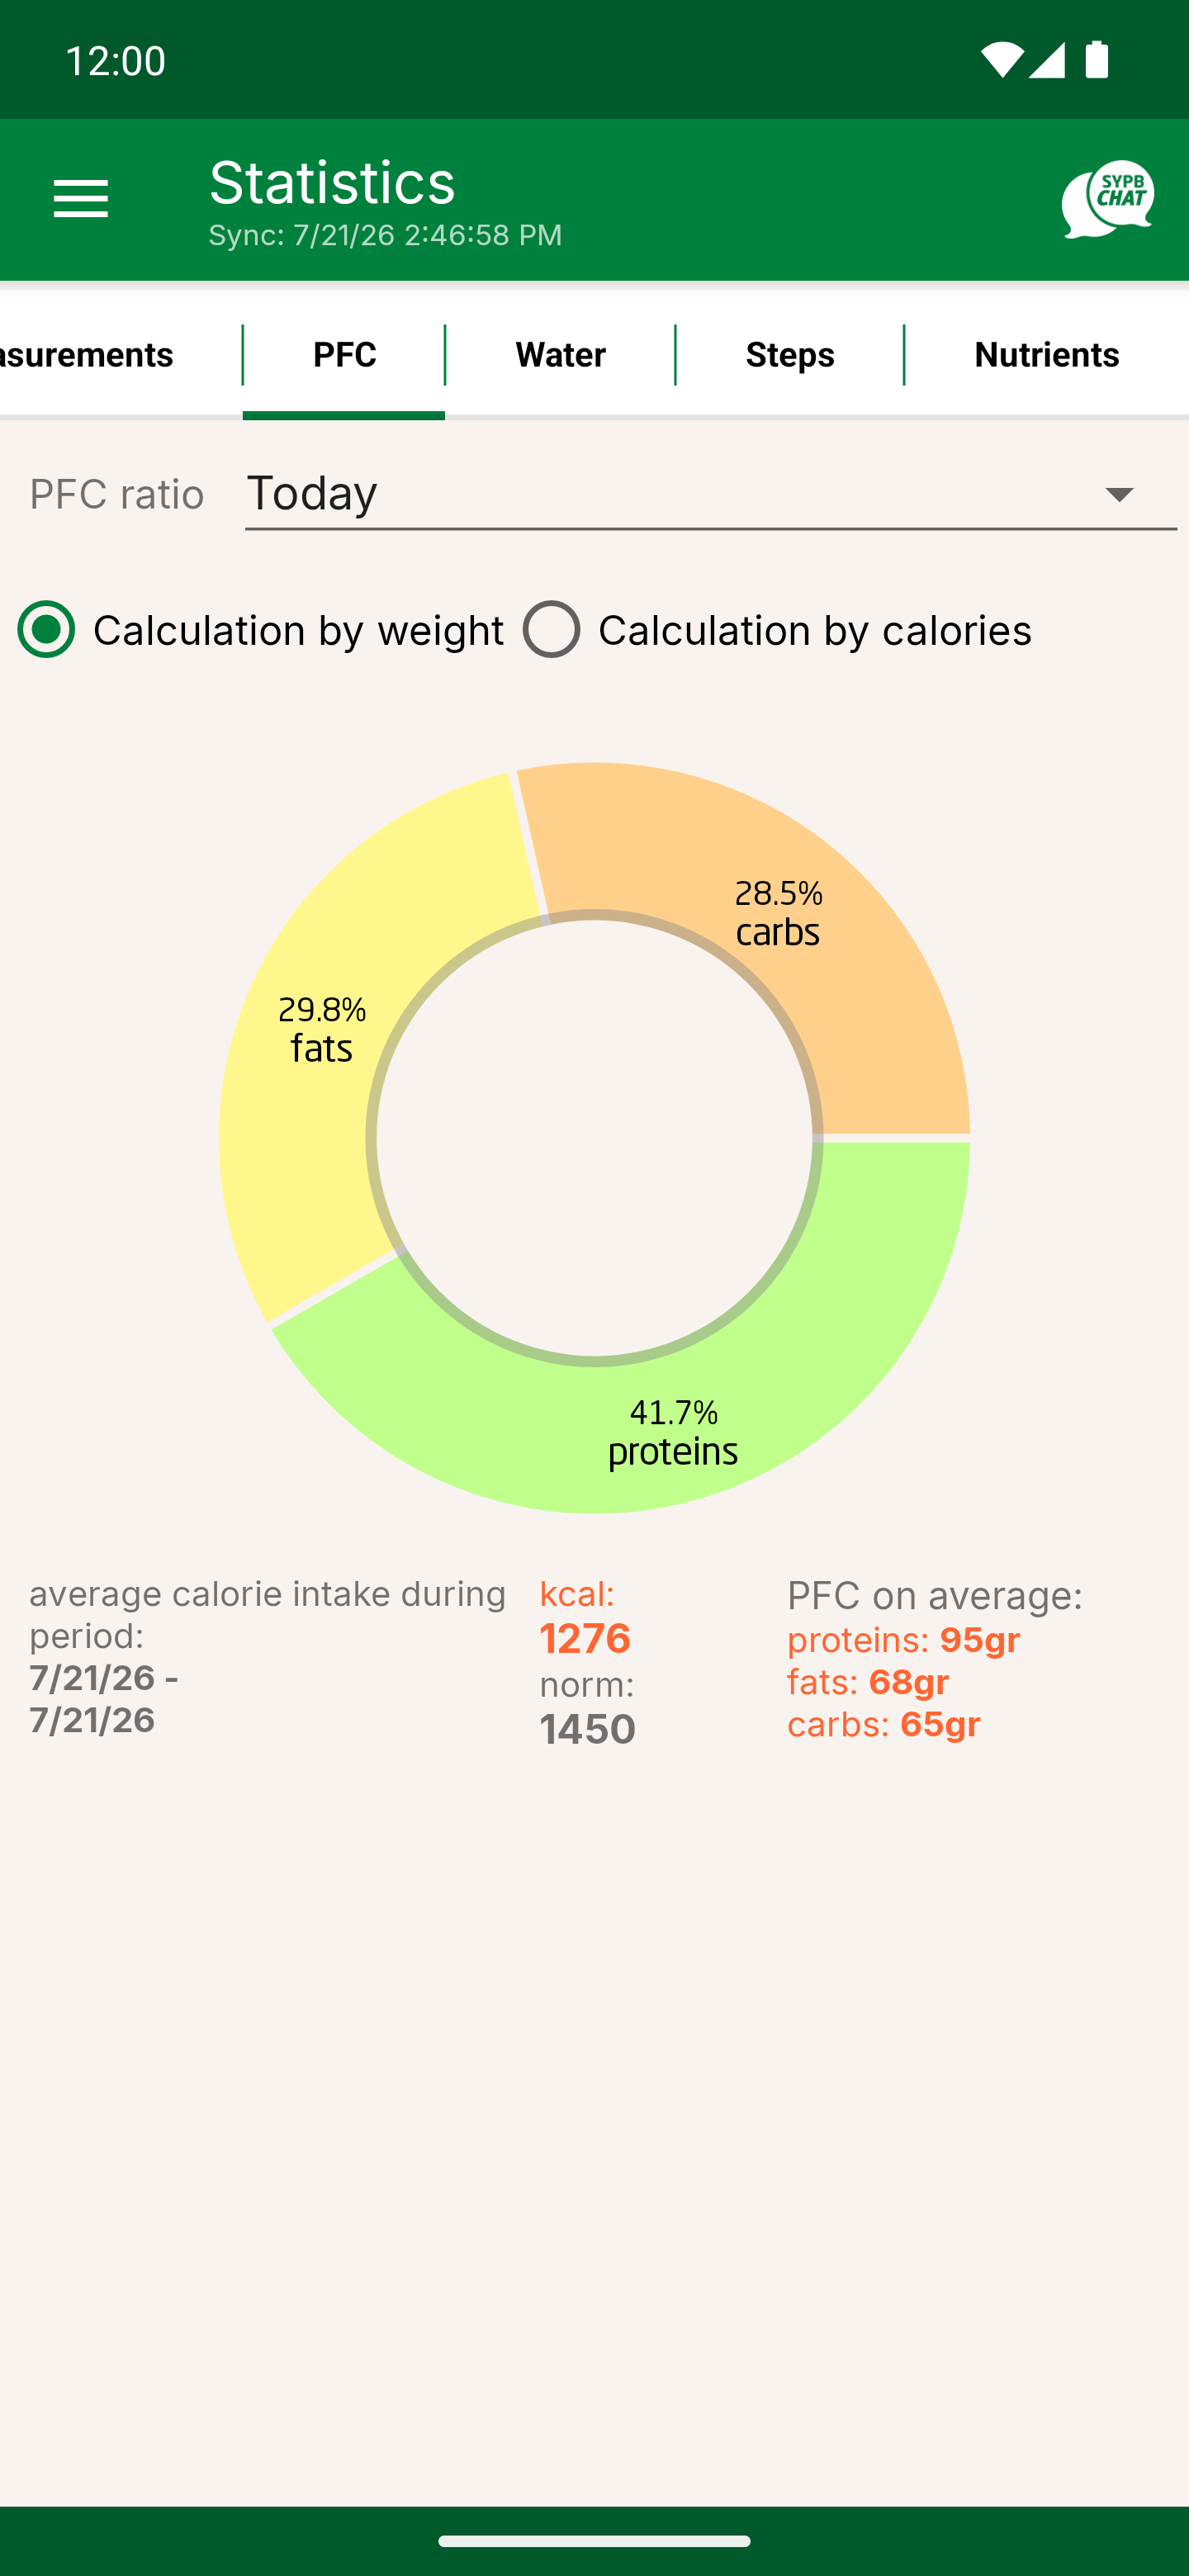
PFC
13 Visualization and Rewards
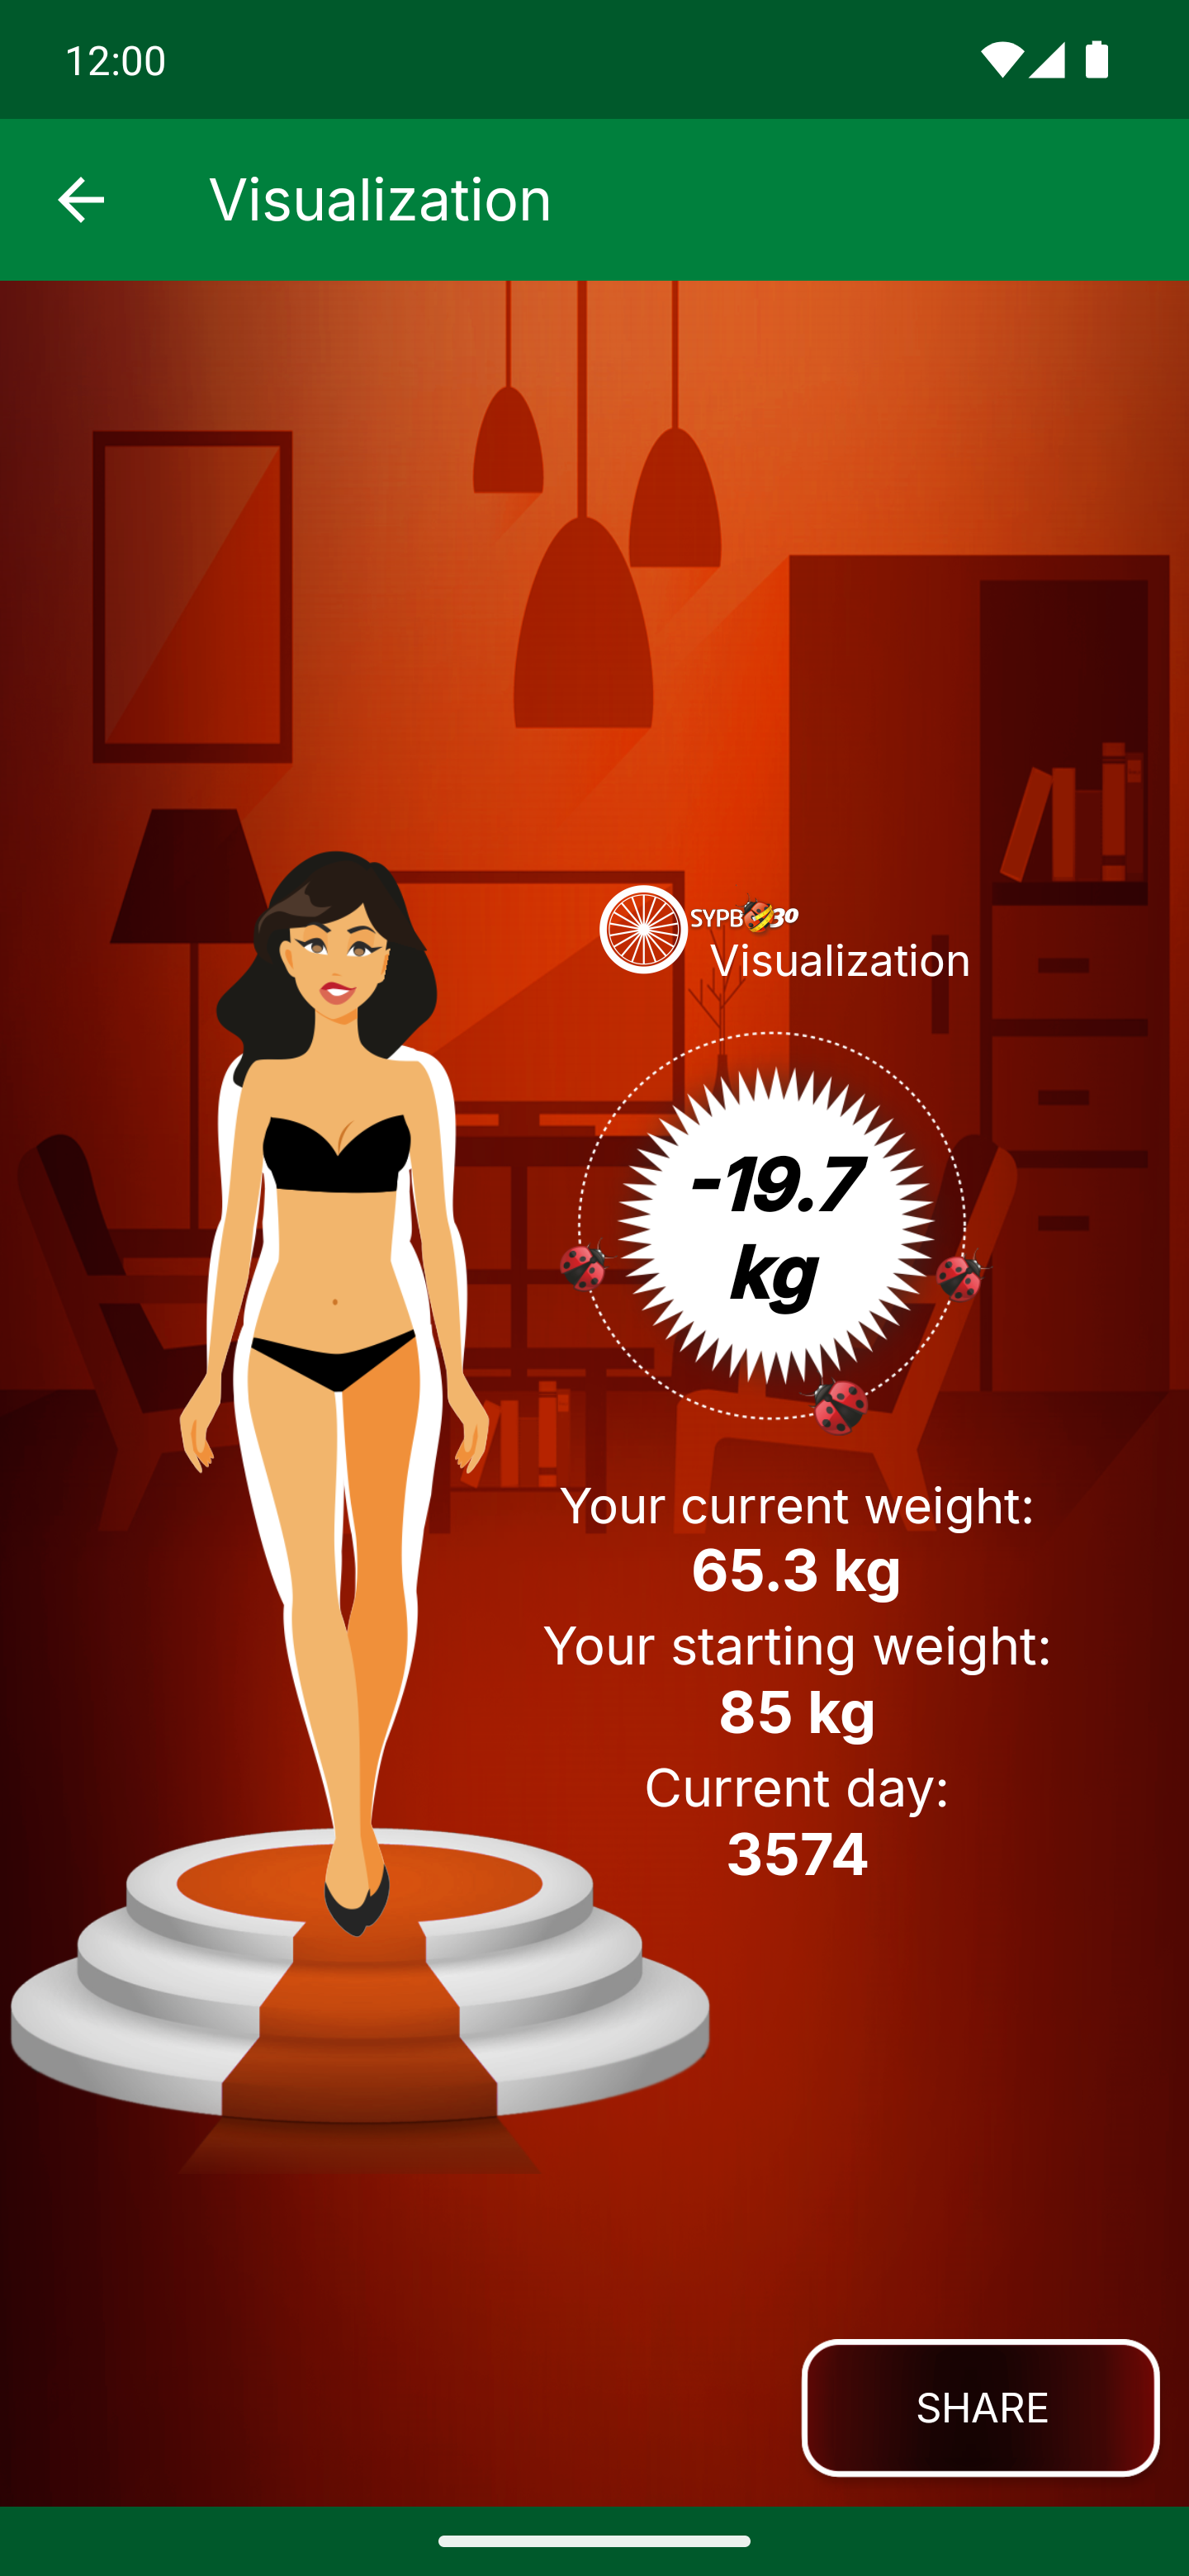
Sections that help you not to quit halfway.

14 Chat and AI assistant
The "SIT CHAT" icon in the Diary header, or side menu → "Chat".

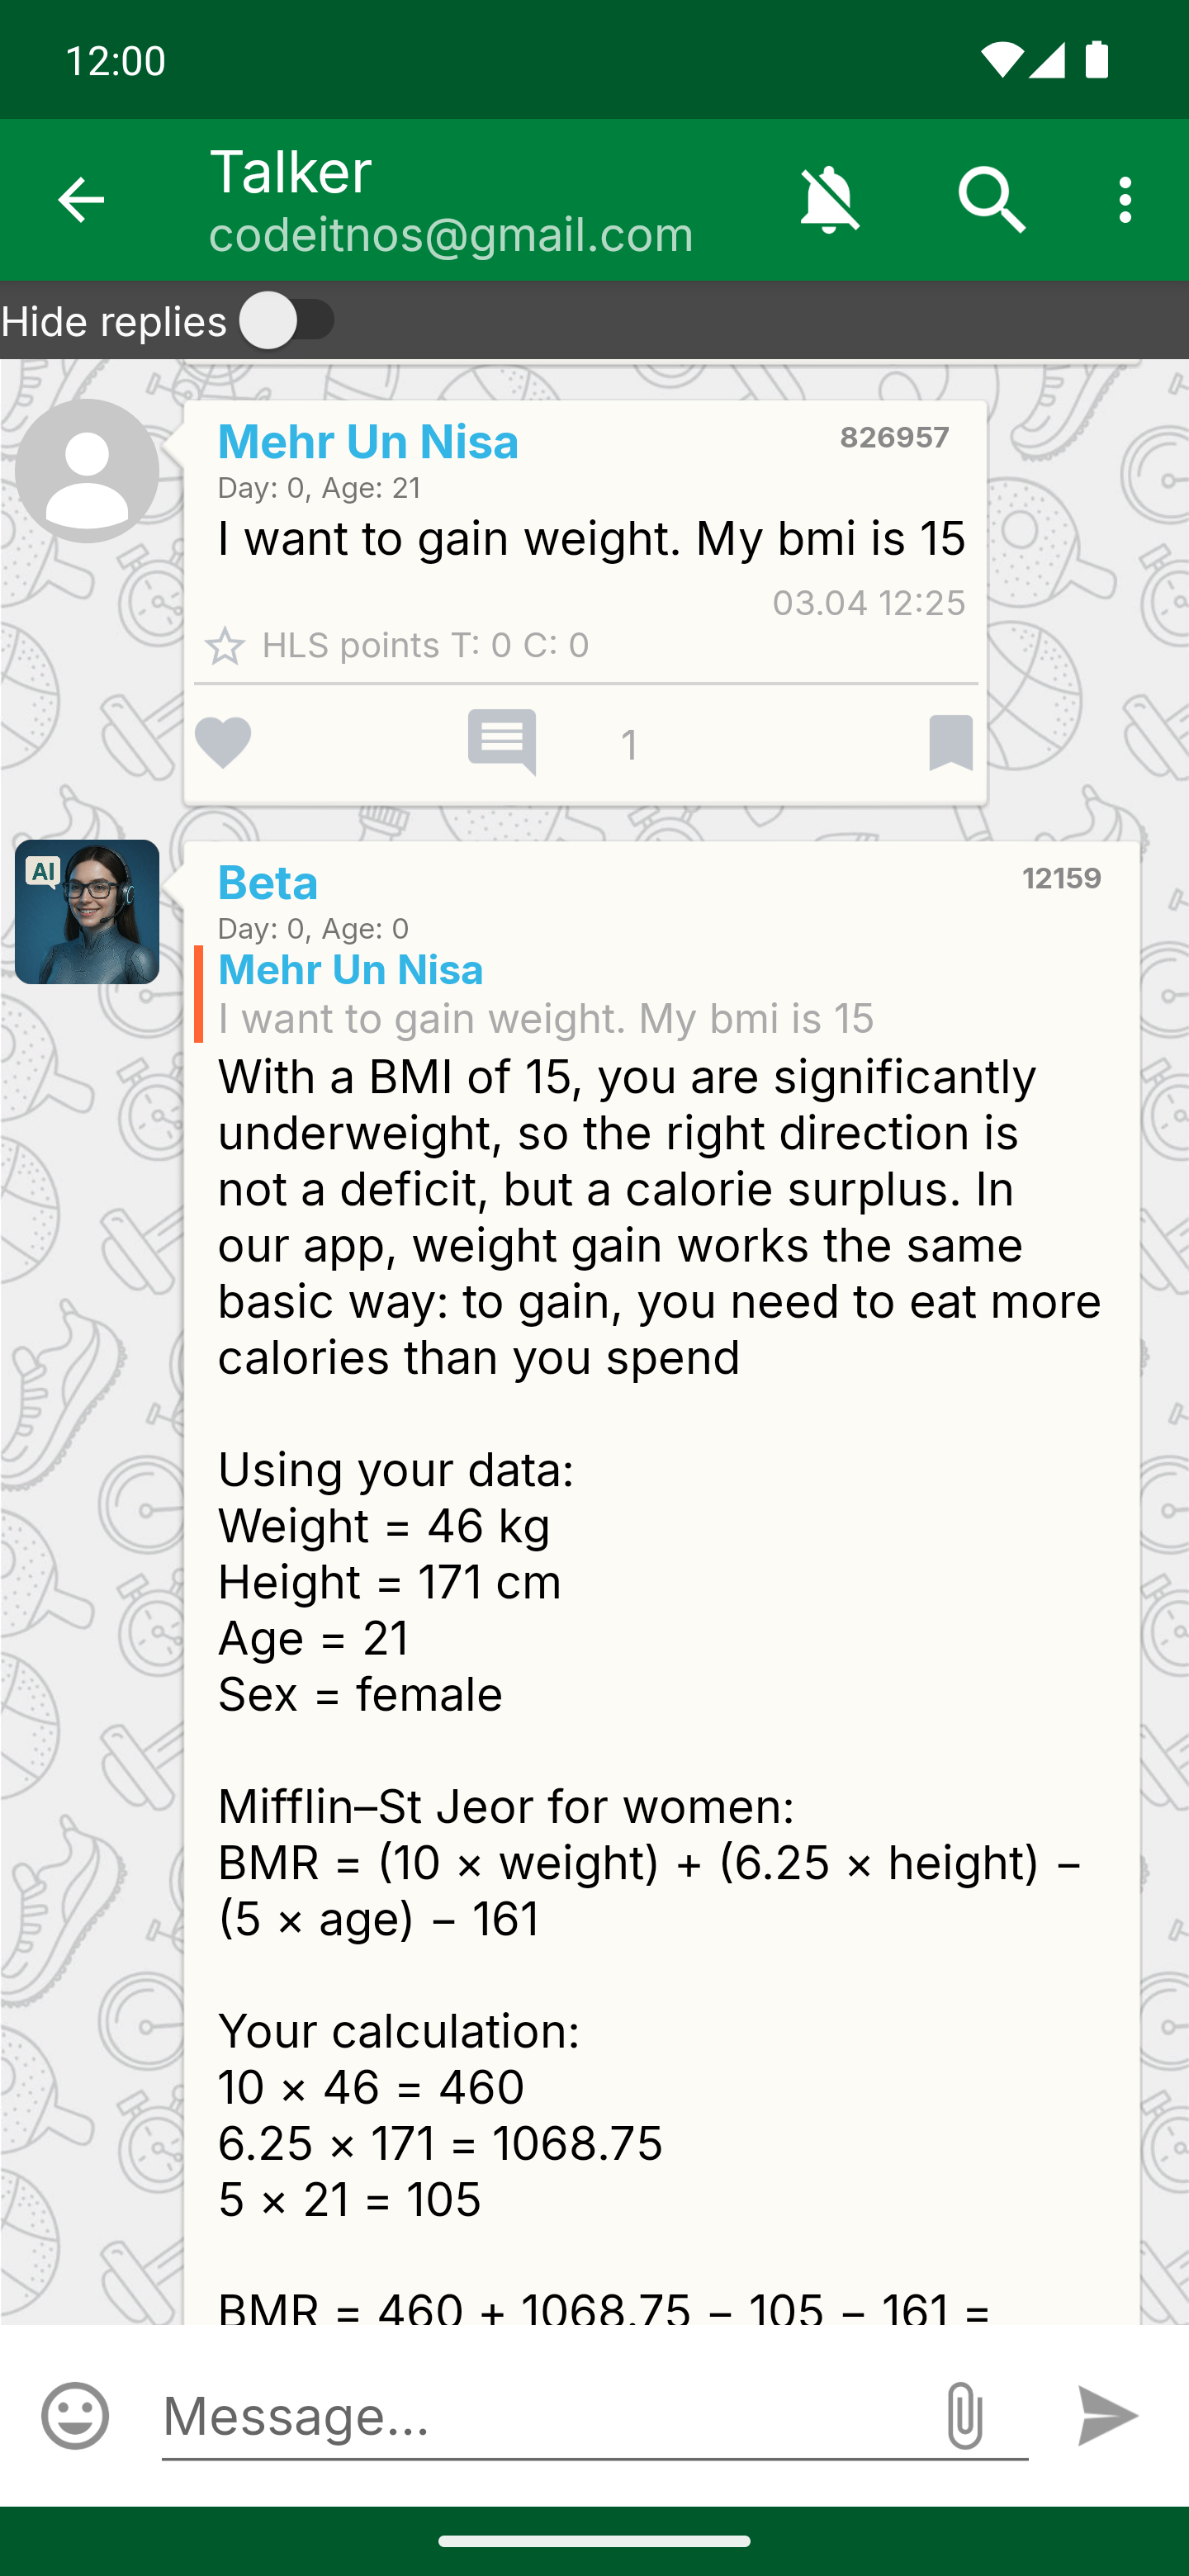
- 1Talker - a topic for newcomers: "you have downloaded the app and have no idea where to start".
15 Proteins, fats and carbs
The main macronutrients. Without a balance between them it is almost impossible to sculpt a lean, good-looking body.
Proteins - the builders
They are responsible for your muscles and are part of every cell in the body: not just muscles, but organs, skin and hair too. They help both when you are gaining mass and when you are losing weight - they give the strongest feeling of fullness and have the highest thermic effect (the body burns more calories digesting them than anything else).
Fats
Something your health and metabolism simply cannot do without. They are the building material for sex hormones. This matters especially for women: without enough fats, periods stop. If fat intake drops critically, libido falls, fat burning slows down, and skin, hair and nails suffer.
Carbs
The main source of the energy you need for daily life and for training. They are divided into simple carbs (absorbed quickly) and complex carbs (absorbed more slowly, but keep you full longer). Give priority to complex carbs.
The app calculates your PFC targets automatically - all you have to do is keep an eye on the colored bars in the top row of the Diary.
16 PFC ratio
We all know: to lose weight you need a calorie deficit, to gain you need a calorie surplus. But if you only look at calories, all that changes is your weight and measurements, while your "body composition" may suffer.
"I lost weight, but my body got flabby" - that is exactly what this is about.
"Body composition" depends on the ratio between muscle mass and body fat. The higher the percentage of muscle and the lower the percentage of fat, the better the body looks. That is why, when losing weight, it is important to lose fat rather than muscle, and when gaining, to build muscle rather than store fat.
If you want to set your own PFC or calorie values, open the Diary, tap the parameter you need in the top row and enter your own number. To make it the default, do not forget to tick the checkbox.
17 Your grocery basket
Eating should feel comfortable. Do not put foods you dislike on your list - there is always a substitute or an alternative.
Sources of protein
Animal sources
- Meat - beef, veal, lamb, pork, game
- Poultry - chicken, turkey, duck, goose
- Offal - liver, hearts, gizzards, lungs, tongue
- Fish - cod, pollock, halibut, tilapia, flounder, sea bream, sea bass, trout, salmon, coho salmon, tuna, pink salmon
- Seafood - shrimp, squid, octopus, mussels, crab, crayfish, oysters, scallops
- Eggs
- Cottage cheese - in a block, grainy, soft, crumbly
- Cheeses - hard, soft, cream cheeses, mozzarella, ricotta, blue cheese, Adyghe cheese, feta
Plant sources
- Nuts - peanuts, hazelnuts, cashews, almonds, Brazil nuts, pecans, macadamia, natural nut butters
- Pumpkin and sunflower seeds, chia seeds, flaxseed
- Legumes - chickpeas, lentils, plain beans
- Tofu
- Flaxseed crispbread, crackers
- Spinach
- Buckwheat, oatmeal, quinoa, dark rice
Sources of fats
Unsaturated
- Avocado, olives
- Nuts and nut butters
- Vegetable oils
- Flaxseed, flaxseed crispbread, crackers
- Seeds, chia seeds
- Hummus
- Fish and seafood
Saturated
- Meat (drumstick and thigh are fattier than breast)
- Poultry
- Offal
- Egg yolks
- Butter
- Dairy products
- Coconut oil
Trans fats - cut them out
- Fast food
- Margarine, spreads
- Baked goods
- Mayonnaise and mayonnaise-based sauces
Unsaturated fats should be your main source of fatty acids. Saturated fats are acceptable, but ideally no more than 10% of your total fat intake. Trans fats are best cut out completely - they are harmful artificial substances that bring the body no benefit at all.
Sources of carbs
Complex
- Any grains - oatmeal, buckwheat, rice, millet, bulgur, couscous, quinoa, pearl barley, barley groats, corn
- Whole grain bread - with no regular wheat or non-whole-grain rye flour in the ingredients
- Whole grain spaghetti and durum wheat pasta
- Flour - whole grain, whole meal, sifted, rice, buckwheat, corn, flaxseed
- Whole grain muesli and granola - with no sugar, molasses, palm or rapeseed oil
- Lentils, plain beans, chickpeas, hummus
- Chestnuts, coconut and coconut chips with no added sugar
- Flaxseed, chia and pumpkin seeds
Simple
- Fruit, berries, dried fruits
- Natural fruit bars and purees
- Honey
- Natural dark chocolate with no sugar, molasses or vegetable oils; natural cocoa powder
Fiber
- Vegetables - at least 400-500 g a day
- Fruit
- Bran (with no flour in the ingredients)
18 Ingredient lists
Reading the label while you're still in the shop is half the battle.
- Read the ingredient list on the back of the pack. Manufacturers often put claims on the front that don't match what's written on the back.
- The shorter and clearer the list, the better. Ingredients are listed by weight: what comes first is what there's most of, what comes last is what there's least of.
- The more natural ingredients, the better. Go for fresh and minimally processed foods.
Also try to keep to a minimum: sugar in tea and coffee, anything with sugar in the ingredients, crisps, salted nuts, fast food, ready meals, instant cereals, spicy foods high in salt, fried foods, sauces, juices, sweet fizzy drinks, canned foods, fried potatoes, baked goods, alcohol, and shop-bought casseroles and syrniki (cottage cheese pancakes).
19 The biggest mistakes when counting calories and PFC
- You estimate by eye and weigh nothing. This is the number one mistake.
- You forget to log small snacks. If you're on a calorie deficit, write down everything you eat.
- You only log ready-made dishes from the database. Instead of creating a recipe to find out the calories of your own dish (an Olivier salad, say), you pick a ready-made salad from the database. But your salad and the one in the database can have completely different calorie counts.
- You don't count the oil you fry in. And you forget the sugar and cream in your tea or coffee.
- You don't count fruit and vegetables. On a deficit you don't have to log every vegetable and fruit: if you eat them rarely or they're low in calories, you can skip them.
If you're not gaining on a calorie surplus, then it isn't a surplus.
It's impossible to count calories with 100% accuracy. There will always be a small margin of error, but it won't affect your progress. Follow the rules for logging your food and you'll keep that error to a minimum.
20 How long to stay in a calorie deficit
A calorie deficit is stressful for the body, so you shouldn't stay on one for long.
If you drag a deficit out for too long:
- your weight will stall and stop going down;
- you'll feel sluggish and tired, with little energy;
- you're guaranteed to break down and binge.
The optimal length of a calorie deficit is 1 to 3 months. If you haven't reached the result you wanted, switch to weight maintenance for a couple of weeks. Then another 1-3 months of deficit, and back to your norm again. Keep repeating until you reach your goal.
How to move to maintenance
It's better to work up to your maintenance calories slowly: add 30-70 kcal each week.
- You're eating 1300 kcal a day (on a deficit).
- Add 50 kcal and start eating 1350 kcal a day (you add 50 kcal once a week, not every day).
- A week later, weigh yourself and take your measurements.
- If your weight and measurements are going down or staying the same, add another 50 kcal.
- If your weight and measurements have suddenly gone up, change nothing: keep eating 1350 kcal and weigh yourself again in a week.
- Repeat until you reach your own maintenance calories.